Your Complete Guide to Rehabbing a House in the Metro D.C. Area

Table of Contents

You might have to get creative to find value in the Washington, D.C., real estate market because prices remain relatively high. One option is purchasing a home requiring significant work and rehabbing the unit before making it available to renters. 

Rehabbing a house involves buying a property needing repairs with the intention of renovating it. Many investors seek out distressed properties at below-market rates and fix them up before marketing the units to tenants. This process requires some time and effort on your part but can be highly lucrative once the home is ready to rent.

You’ll need to develop a plan before implementing this investment strategy to ensure your project stays on track. This guide discusses the steps to rehabbing a house in the Washington, D.C., area and looks at the costs associated with the job.

Determining the Cost of Rehabbing a House in D.C.

The average cost of rehabbing a house depends on how much work the property requires. The appliances, flooring options, fixtures, and building materials you select for your renovation will also influence your expenses. Some general categories your rehab could fall into include the following:

Low-Cost Upgrades

The least expensive rehabbing expenditures you might encounter are some low-cost upgrades or updates. These jobs include painting the interior and exterior of the home, buying new cabinets, switching out some appliances, and completing landscaping work. You may be able to handle many of these jobs yourself, but the work will be relatively inexpensive if you hire a contractor.

Medium-Cost Renovations

Medium-cost work could include remodeling a kitchen or bathroom and upgrading all the house’s appliances. It could also involve replacing or restoring the flooring and replacing the windows. These jobs take longer to complete, and most require professional assistance, which adds to the cost. 

High-Cost Repairs

Some of the most expensive repairs your house-rehabbing job might require include fixing structural issues with the building, replacing the roof, or repairing the foundation. You could also experience problems with the home’s electrical system or plumbing. Many homes requiring these high-cost repairs might not be worth it because of the work and expense that goes into getting them ready for tenants.

The cost of rehabbing a house varies significantly depending on the work required and the options you select. You’ll need to develop a budget early to ensure you make the right investment property decisions. 

Seven Steps to Rehabbing a House in Washington, D.C.

Rehabbing a property can be complex, so you’ll need a plan before you begin. Create a strategy early in the process to avoid spending more money than you need to, which could hinder the investment’s profitability. Seven steps to follow as you rehab a house include the following:

1. Evaluate the Property’s Condition

The first step is evaluating the property’s condition to determine how much work it requires before it’s ready for tenants. You’ll ideally complete this job before purchasing the house, but that might not be possible if you’re buying a distressed property at auction because you might not have the opportunity to peek inside. You can break your evaluation down into must-repair and optional sections to help as you create your budget.

2. Create a Checklist

Developing a rehabbing-a-house checklist is vital to the success of your job. This checklist should include a list of items that require repair, updates, or maintenance both inside and outside the home. You can use this checklist to determine how much work the house rehab will need before it’s ready for your first renters. 

3. Develop a Budget

Your checklist will also help you create a budget for the job. You’ll want to secure multiple quotes from contractors during this stage to give you a clearer idea of how much you should expect to pay for each repair. Sticking to your budget is vital because you don’t want the repairs to make the property unprofitable.

4. Choose a Contractor

Hiring a contractor to work on your unit is critical to rehabbing a house. You can sometimes hire a general contractor to oversee the entire project and find subcontractors to complete specific items on your checklist. You’ll want to conduct interviews and check references the first time you work with a contractor to minimize the issues you potentially experience. 

5. Pull the Necessary Permits

The D.C. Department of Buildings (DOB) Homeowner’s Center provides most of the permits you’ll need before starting the rehabbing job. Permits are necessary for almost any renovation you’ll complete, including drywall replacement, interior remodeling, window replacement, deck installation, and addition construction, and you can apply for your permits online. Your licensed contractor must apply for additional plumbing and electrical work permits via the DOB’s Permit Center.

6. Complete the Job

Starting the home rehabbing process is the next step after you have your contractor and permits in place. You might want to handle some of the demolition yourself to reduce costs if you have some home renovation experience or can do it safely. You’ll then wait for your contractors to finish the skilled work so you can begin earning on your investment.

7. Find Renters

You’ll need renters for your new investment property, so marketing the home is a vital part of this process. You’ve already put considerable resources into the house, so you want to avoid ending up with problem tenants who will damage it or fail to pay rent.

Following these steps will take some time, but you’ll have your investment property ready to go if you follow them. You can then begin earning money on your rental unit and setting yourself up for the future.

How a Property Manager Can Help

You don’t want to take any chances with your investment property because it’s vital to your financial goals. Hiring a property management firm to seek and screen tenants, collect rent, and deal with repairs makes sense because it will minimize your workload and limit the chances of something going wrong with your rental home.

Nomadic Real Estate offers property management services in the metro D.C. area. Our team will ensure you find the right tenants after rehabbing your house, maximizing your return on investment. Contact Nomadic Real Estate for information on hiring a property manager to care for your rental home.

Share via Email
Share on Facebook
Share on LinkedIn
Share on Twitter
Get help from DC's top real estate team.
Founded in 2005, Nomadic is the go-to full service real estate firm in the DMV. We've helped thousands of landlords, investors, and residents and we would love to connect with you next.

Check out more of our blog posts below!

Or search for a different topic:

Scroll to Top

Enhanced Reporting

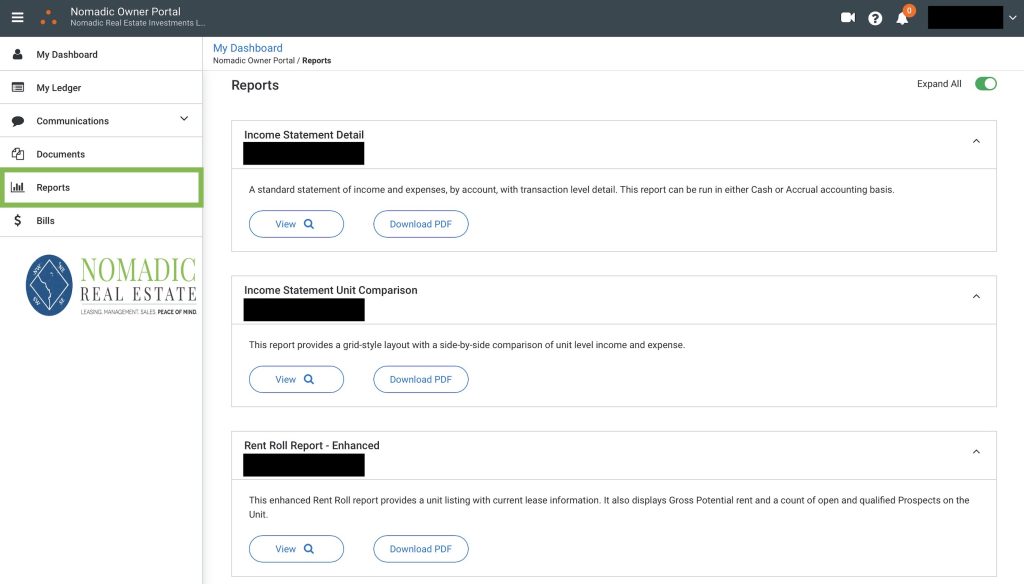
Your portal includes a selection of extremely useful reports. Reports are available in the “Reports” section, and are distinct from the financial statements. Unlike financial statements which are static records, Reports are dynamic real-time records that will update with current data every time you view them. 

Scroll down to learn more about Reports:

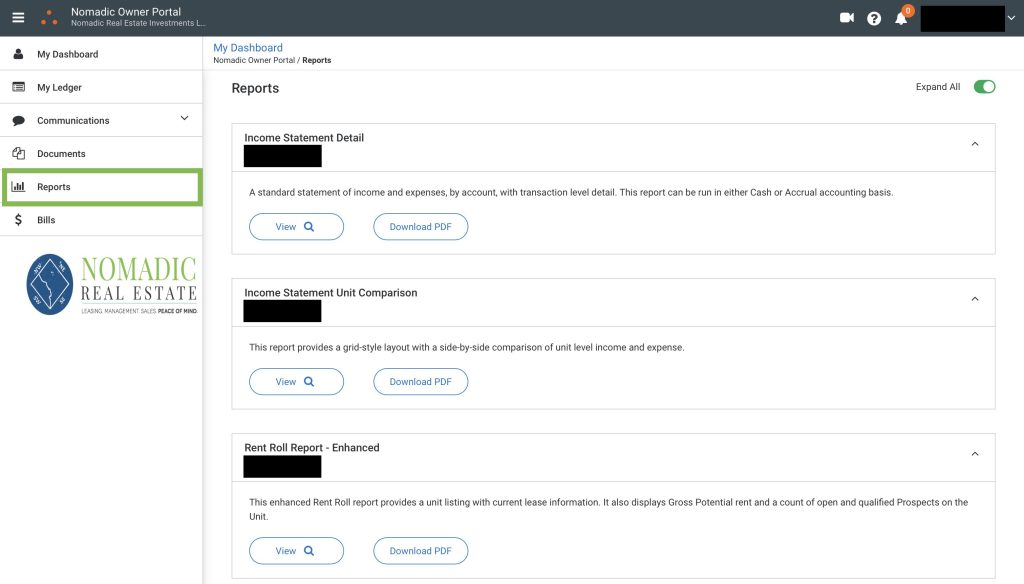
Navigate to the "Reports" module in your portal:

Owner Portal Reports
  • Keep in mind, these reports are dynamic records. They will refresh to display current information every time you view them. 

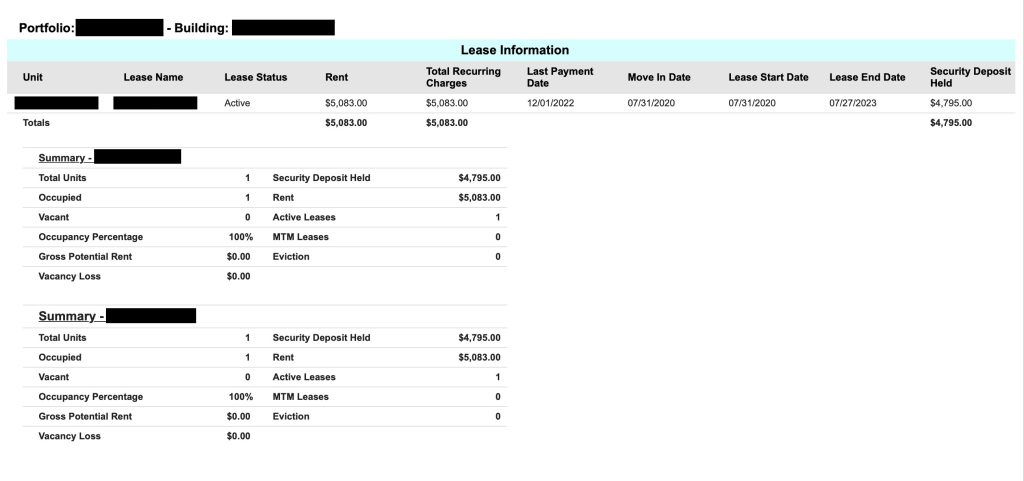
Enhanced Rent Roll Report:

Enhanced Rent Roll Report
  • The Enhanced Rent Roll Report will show the rent amount, last payment date, move-in date, lease expiration date, and security deposit amount for each of your tenants. 
  • It will also show a portfolio summary with occupancy percentage, vacancy loss, and more!

Unit Comparison Report:

Unit Comparison Report
  • If you own multiple units (or buildings) with Nomadic, you’ll get access to the Unit Comparison Report. 
  • This report enables you to quickly compare financial performance between your units at a glance without toggling between individual reports. 

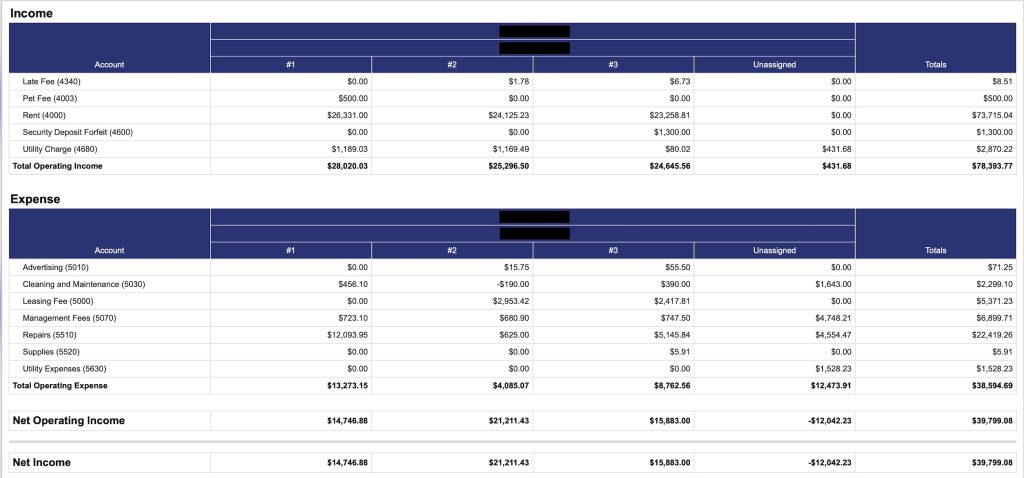
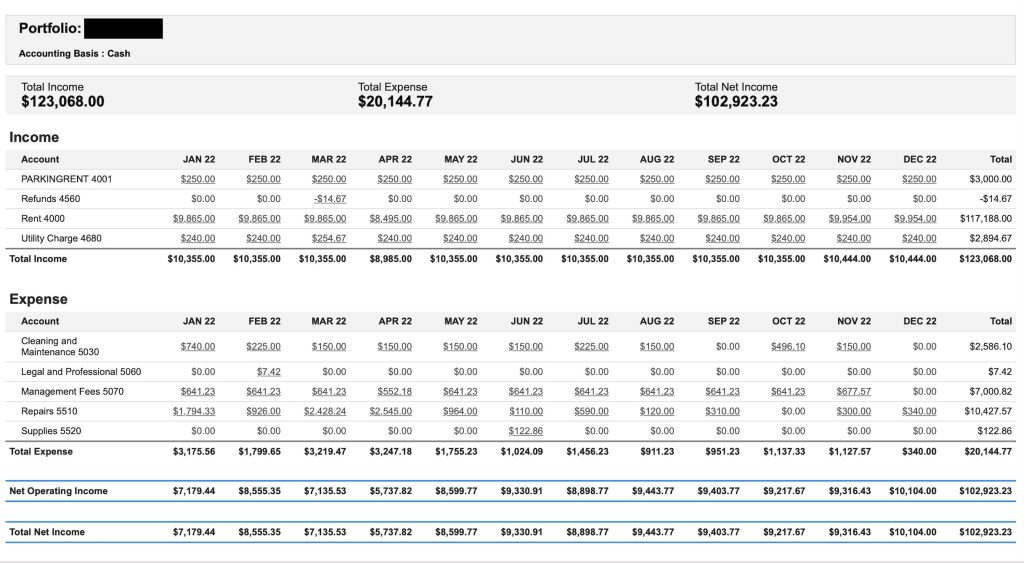
Income Statement Month-Over-Month:

Income Statement by Month Report
  • The Income Statement Detail – Monthly Report serves as a month-over-month record of portfolio performance. You’ll see itemized income and expense categories and can track monthly. This report will update with fresh data every time you view it. 

Financial Statements

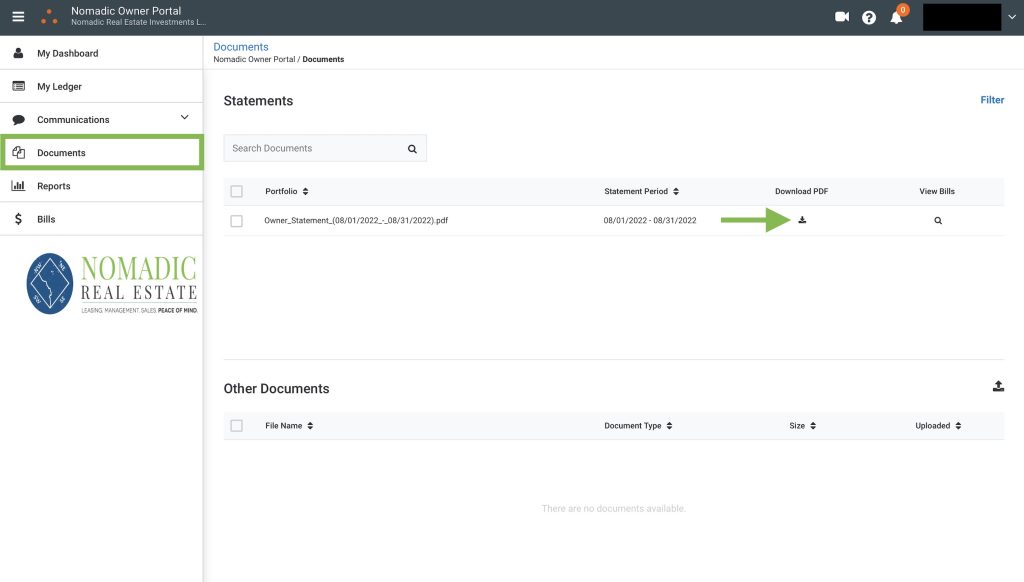
Financial statements will be published to your portal on a monthly basis. The statements are found in your Documents library, and provide a historical record of all financial performance. The statements serve as a snapshot of financial performance over a given period, and are static documents (unlike Reports, the statements do not update/change in real-time). 

Scroll down for more info about the Financial Statements in your Documents library:

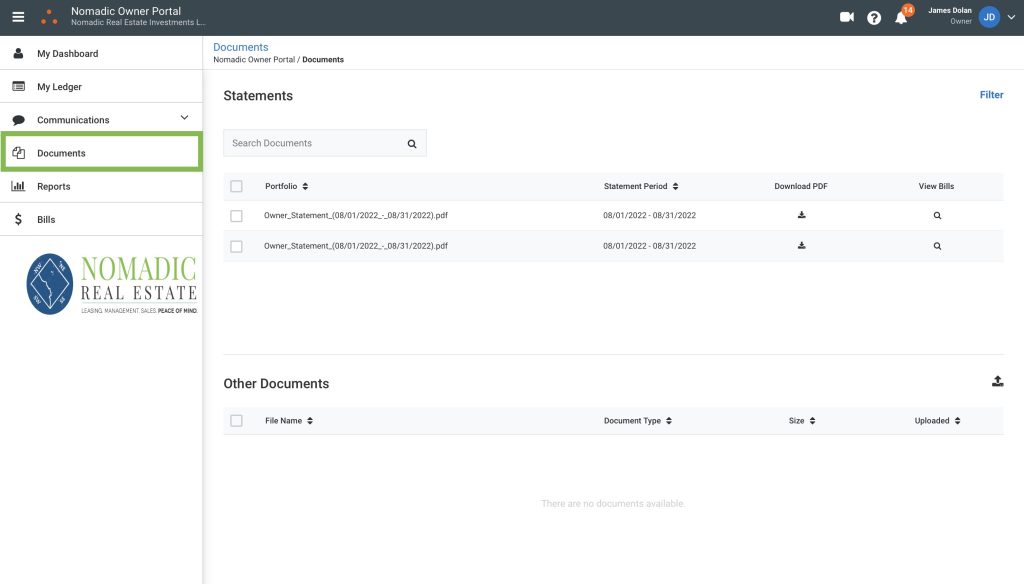
The Documents area contains monthly financial statements:

Owner Portal Documents
  • The statements in the Documents are are static documents. They are posted to the portal once a month to serve as a historical record of financial performance. 

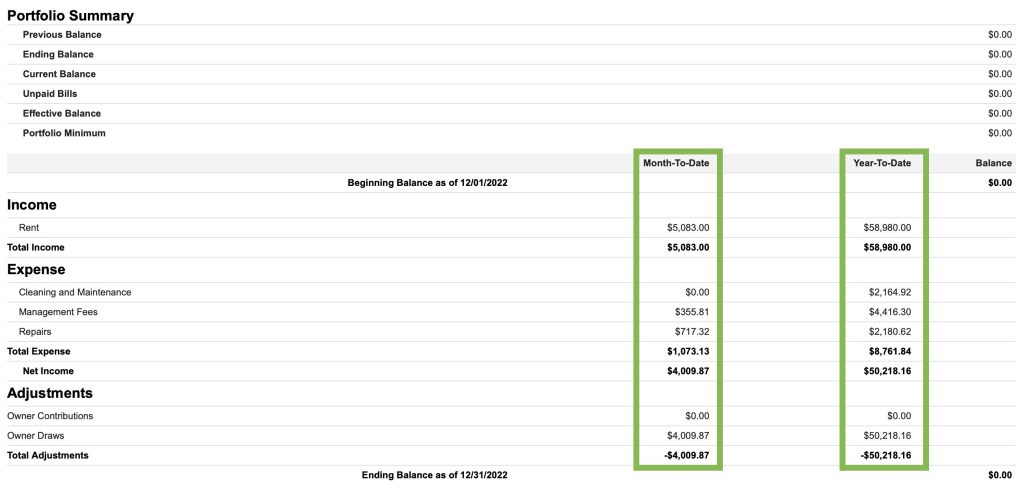
Download a statement to see month and YTD financials:

Owner Portal Property Statement

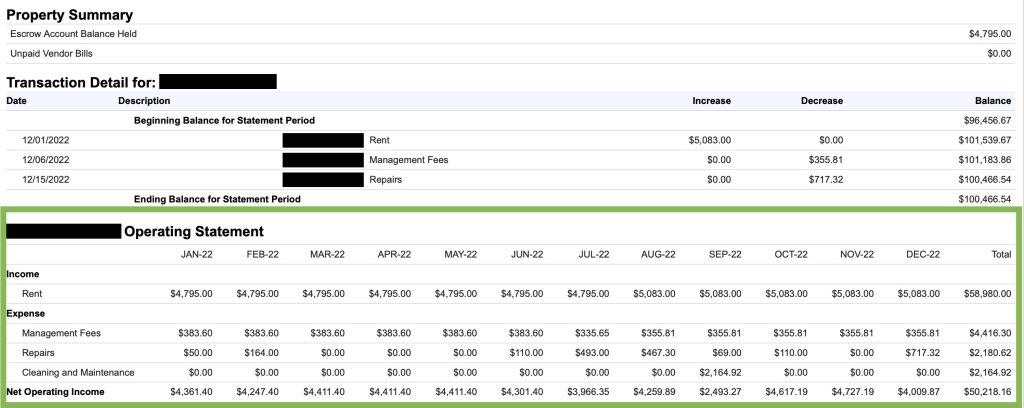
You'll also find a month-over-month operating statement:

Month over Month Statement

Portal Communication Tool

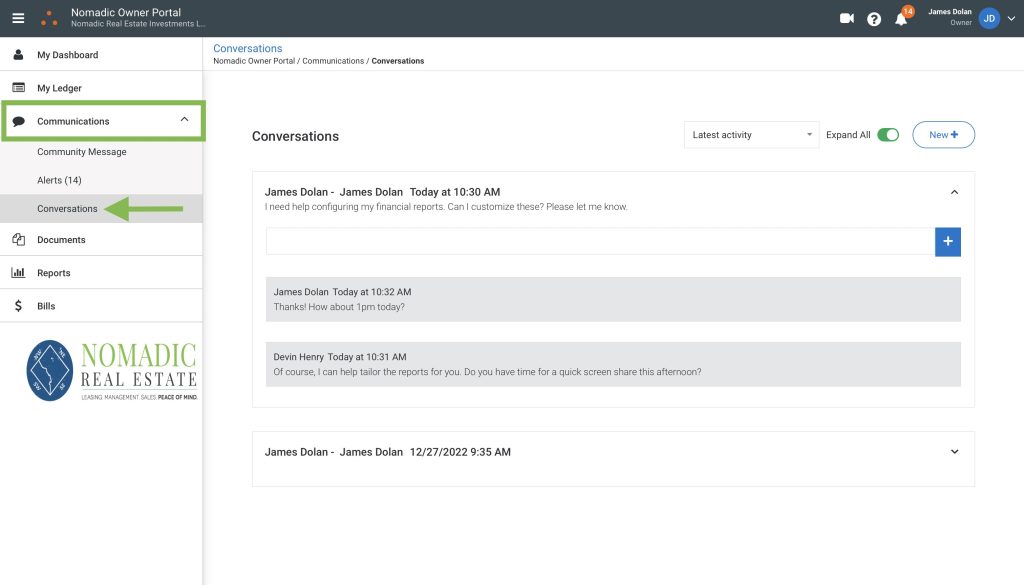
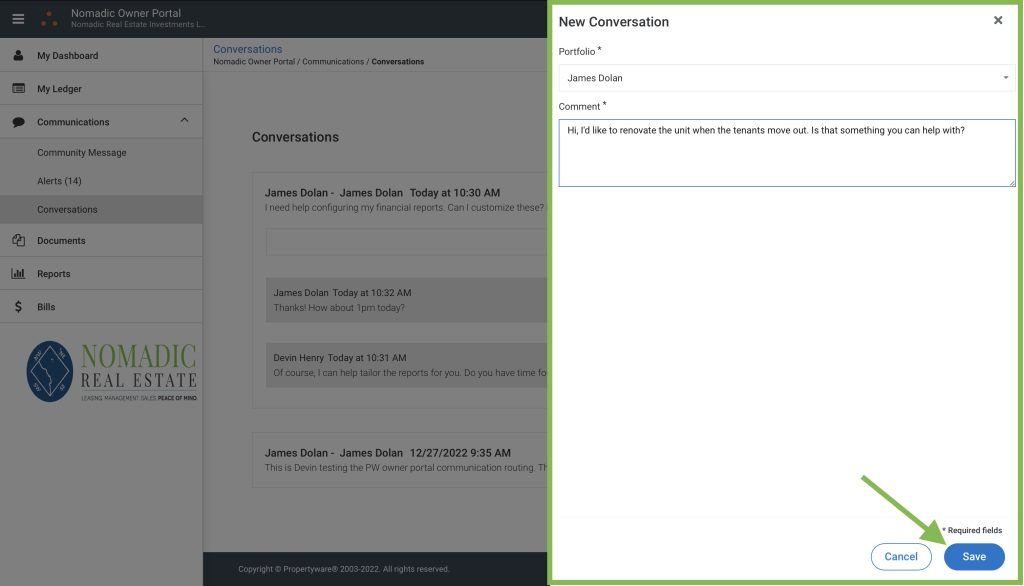
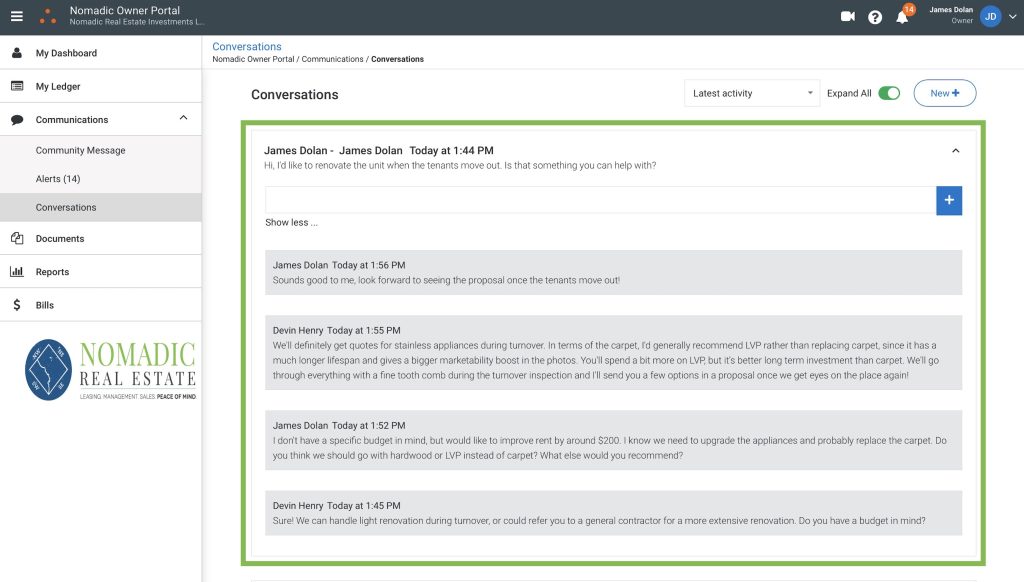
You can use your owner portal to communicate with our team. Any messages you send through the portal will go straight to your Account Manager. When we reply, you’ll get an email notification and you’ll also see the message in your portal next time you log in. 

Here’s an overview of using the communication platform:

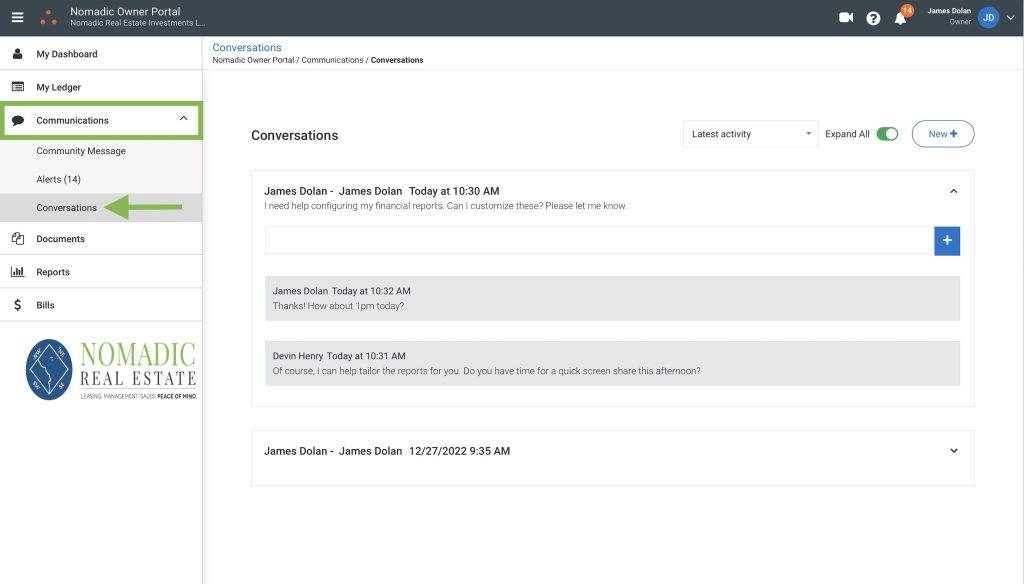
Click "Communications" and navigate to "Conversations":

Commincation Dashboard Screenshot
  • The communications module will contain a record of all messages that you create through the portal. 

Click the "New Message" button and send your message:

Owner Portal New Message Screenshot

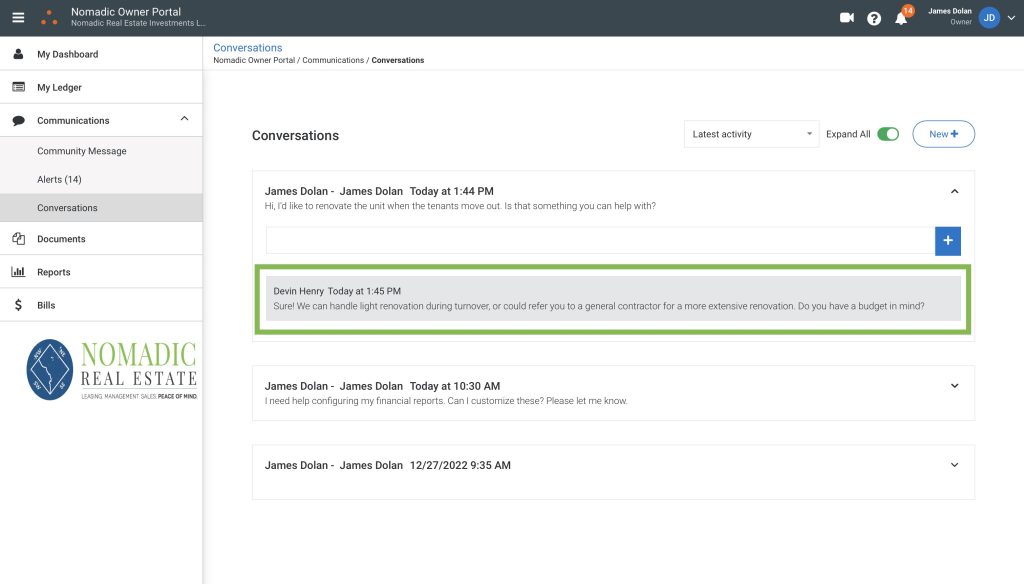
Responses will show up in the conversation ticket:

Portal Conversation Response Screenshot
  • You’ll get an email notification whenever you get a response, and you’ll also see the message in your portal next time you log in. 

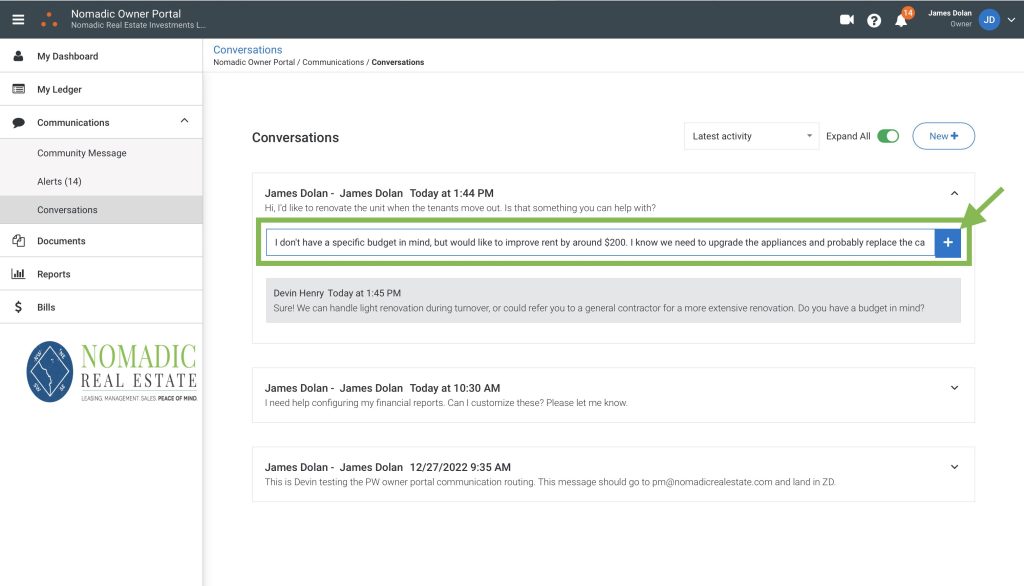
You can reply in-line using the comment box:

Owner Portal Comment

Each conversation will be logged in its entirety:

Portal Conversation Snapshot

Understanding the Ledger

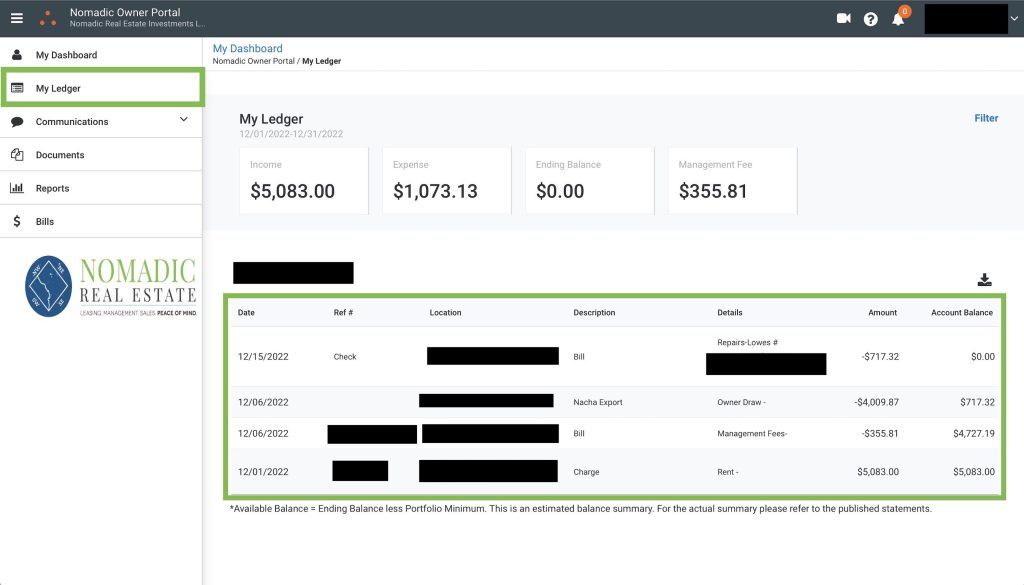
Your portal includes a ledger with all transactions. The ledger is populated with data in real-time as transactions flow through our accounting software. Much of this information is also available in the Reports area, as well as the Statements in your Documents library, but the ledger is the most comprehensive resource for diving into the details. 

Please scroll through the sections below to get a better understanding of how to interpret the ledger. 

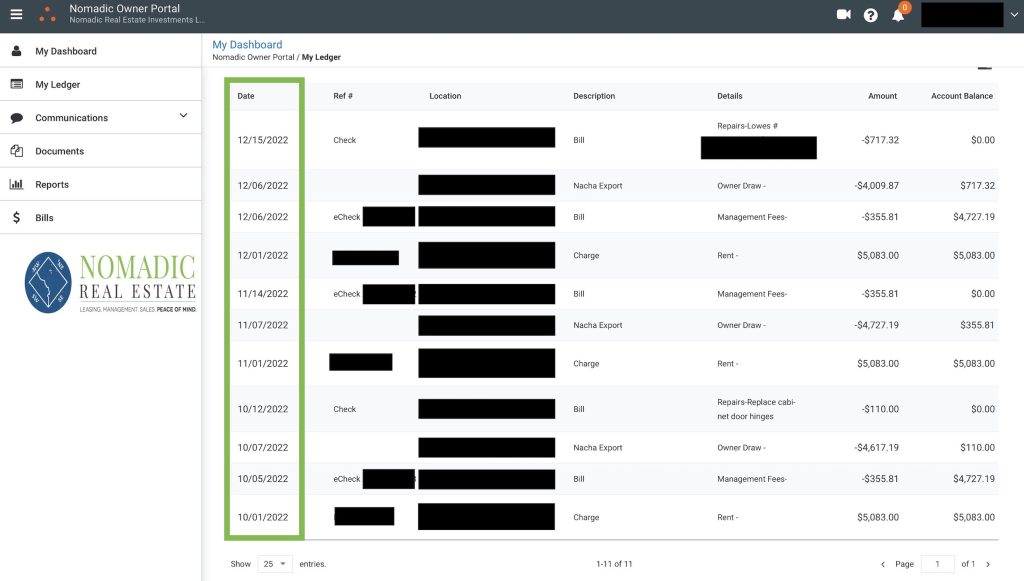
By default, transactions are sorted chronologically:

Owner Ledger Dates
  • The date reflected in the lefthand column is the actual transaction date, not the “bill date”. This is the date the transaction was actually processed. 

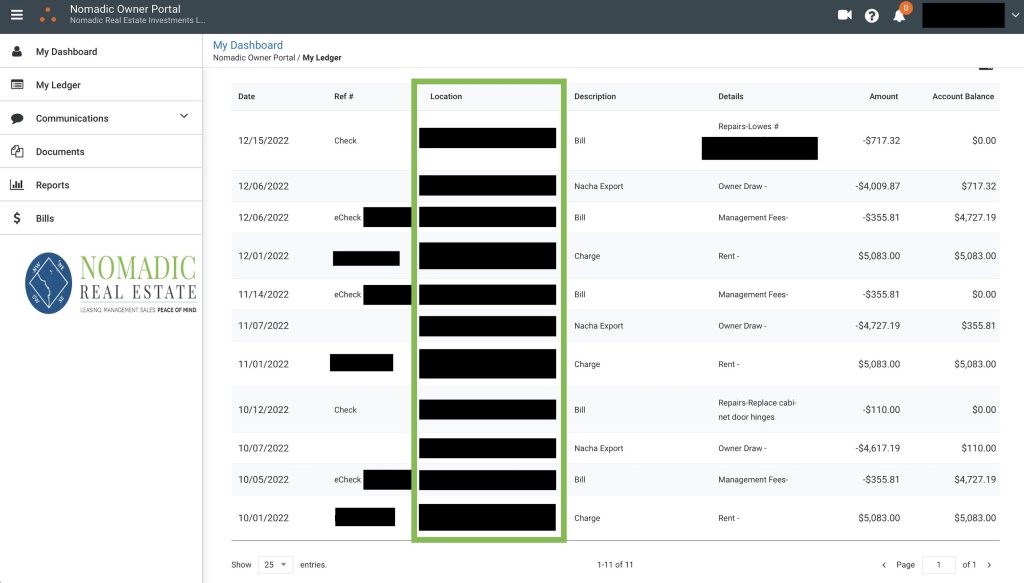
If you have multiple properties with Nomadic, you'll see the address for each transaction in the "Location" column:

Ledger Property Column
  • You can filter the ledger to look at just one property, all properties, or specific sets of properties. 
  • If you only have one property with us, you’ll just see the ledger for that property. 

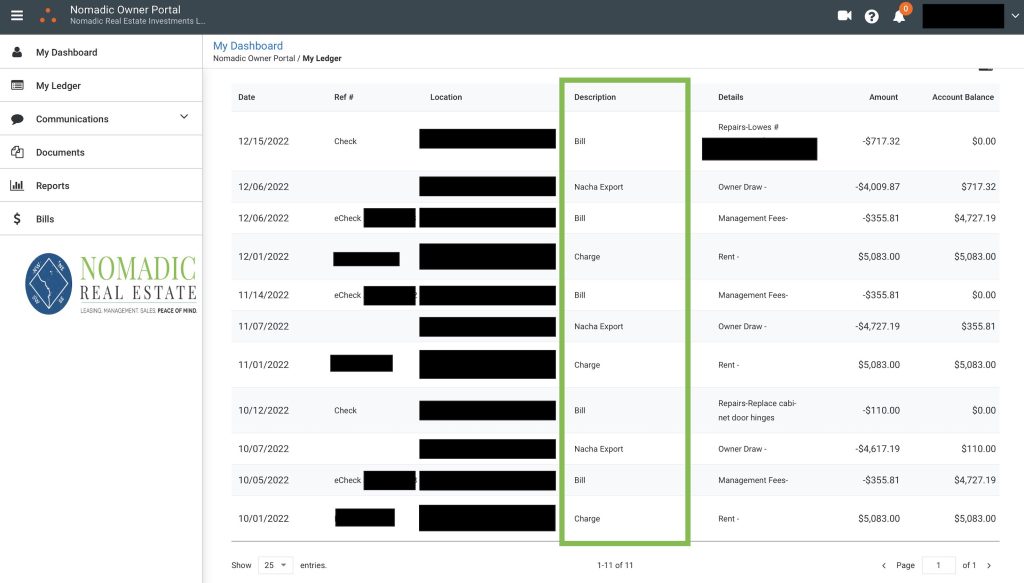
The Description column displays the transaction type:

Owner Ledger Description Column
  • BILL: this is an expense transaction, such as for repair costs or management fees.
  • CHARGE: this is a transaction  billed to the tenant, most typically a rent payment. 
  • NACHA EXPORT: this is a credit we processed to your distribution account. This type of transaction is how you get paid! 

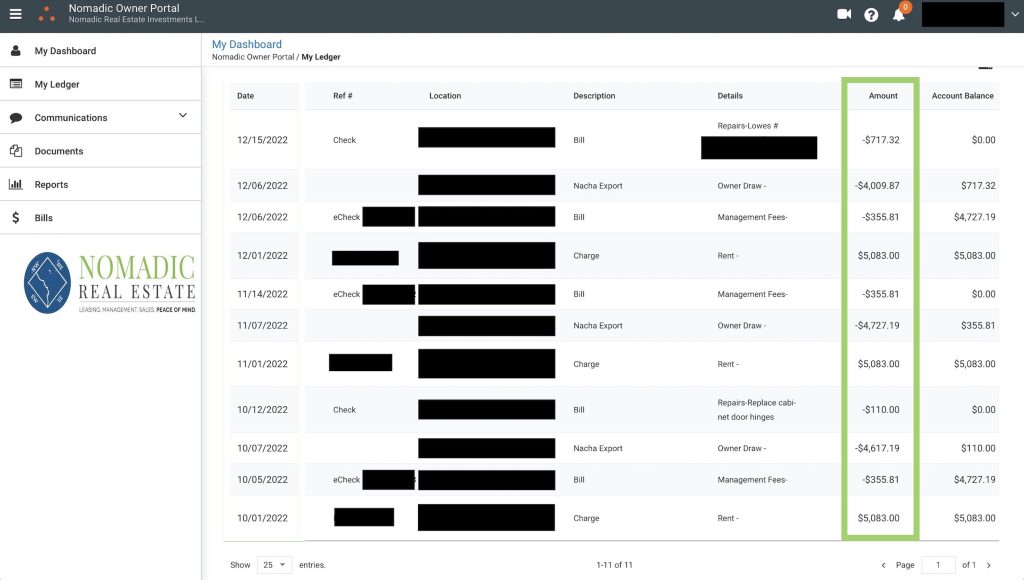
The Amount column shows the dollar value of each transaction:

Owner Ledger Amount Column
  • Positive Amounts: if an amount is positive, it reflects a transaction that is payable to you. Typically, this will be a rent payment that we collected from your tenants. On occasion, a positive number could also signify a journal entry or credit adjustment. 
  • Negative Amounts:  if an amount is negative, this is a transaction that is either payable to Nomadic or is an amount that has already been paid to you. Typically this will be for repair costs or management/leasing fees. Owner draws (net distributions into your checking/savings account) also reflect as negative amounts, since they have already been paid to you. 

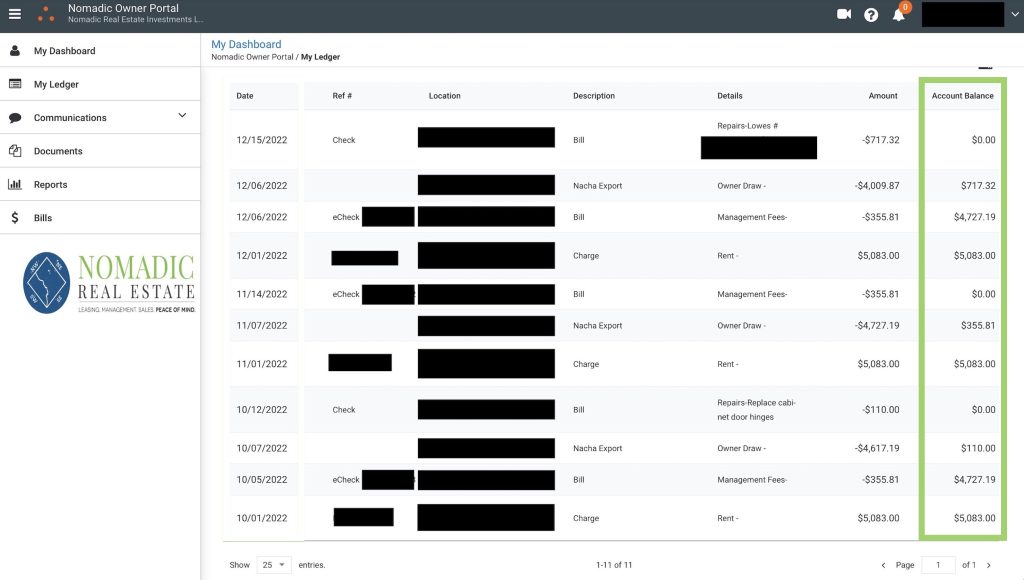
The Account Balance column shows a sum of positive/negative transactions at a given point in time:

Owner Ledger Account Balance Column
  • Account Balance should always equal zero after a net distribution has been processed. When the balance is zero, this means that all expenses have been paid and you’ve received the remainder as net operating income, leaving a balance of zero (meaning: no one is due any money, as all funds have been distributed appropriately). 

Navigating the Propertyware Owner Portal

Your portal includes some extremely useful features that help you understand your property’s financial performance at a new level, with real-time transparency into every transaction.

Scroll through the snapshots below for an overview of portal navigation! If you need more help or have specific questions about using the portal, you can reach out to your Account Manager any time for a screen share. 

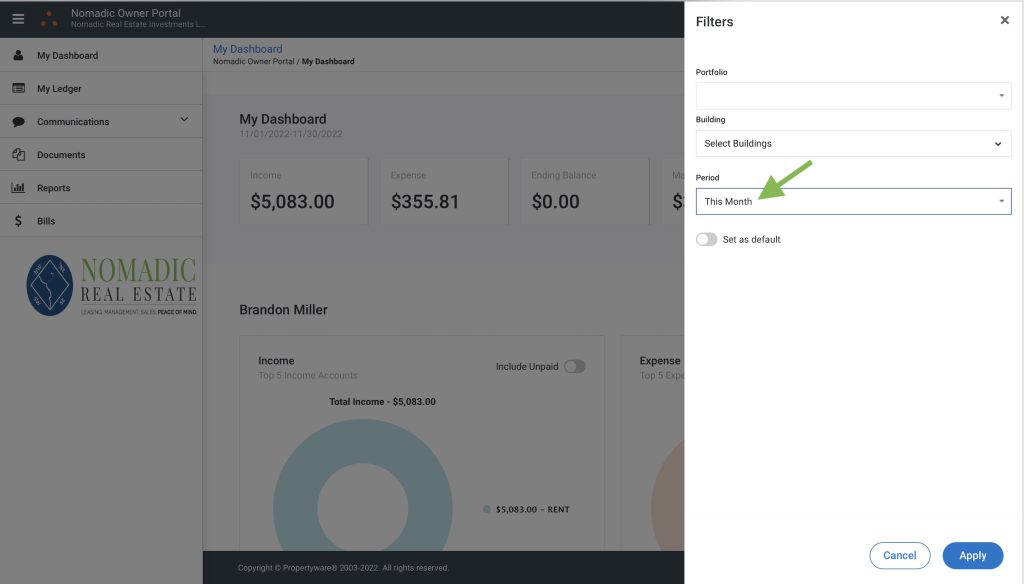
You can filter all info by date range or property:

PW Portal Filters

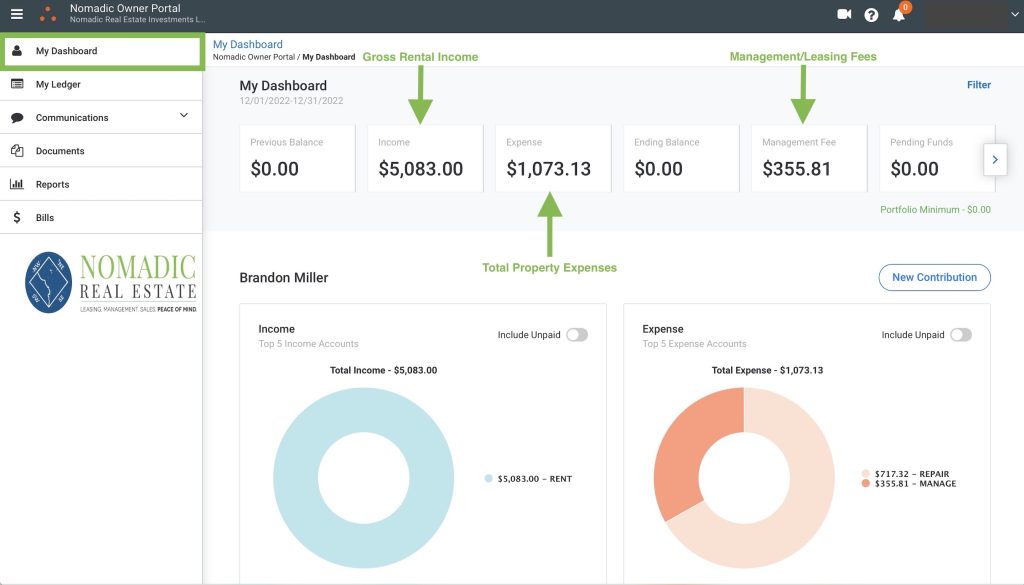
View a snapshot of income and expenses on your dashboard:

PW Owner Dashboard View

See every transaction in real-time on your ledger:

Owner Portal Ledger View

Statements and forms will be posted to your documents library:

Owner Portal Document Library

View a suite of real-time financial reports:

Portal Reports View

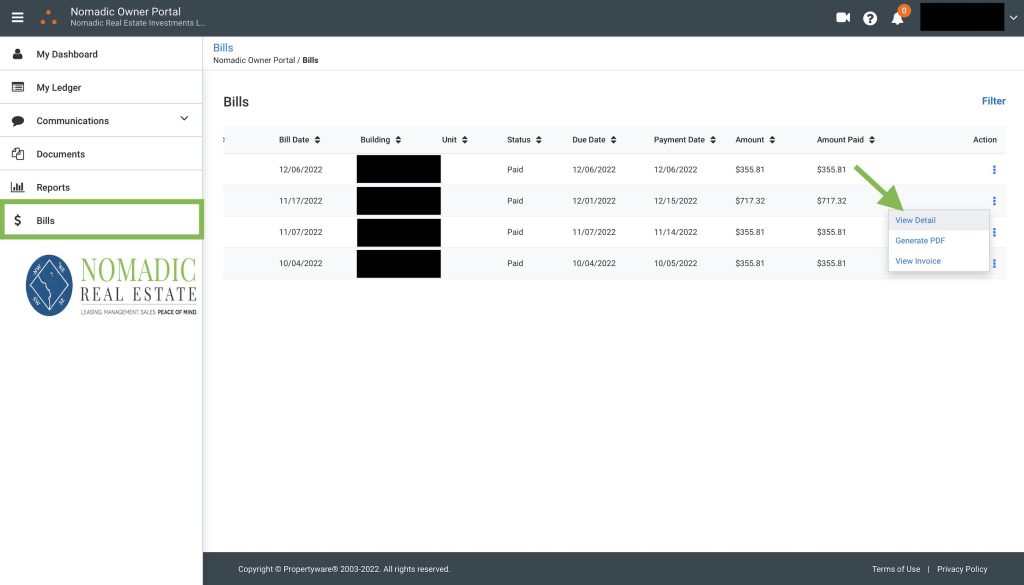
See a running list of all bills, and drill down for more detail:

Owner Portal Bills View

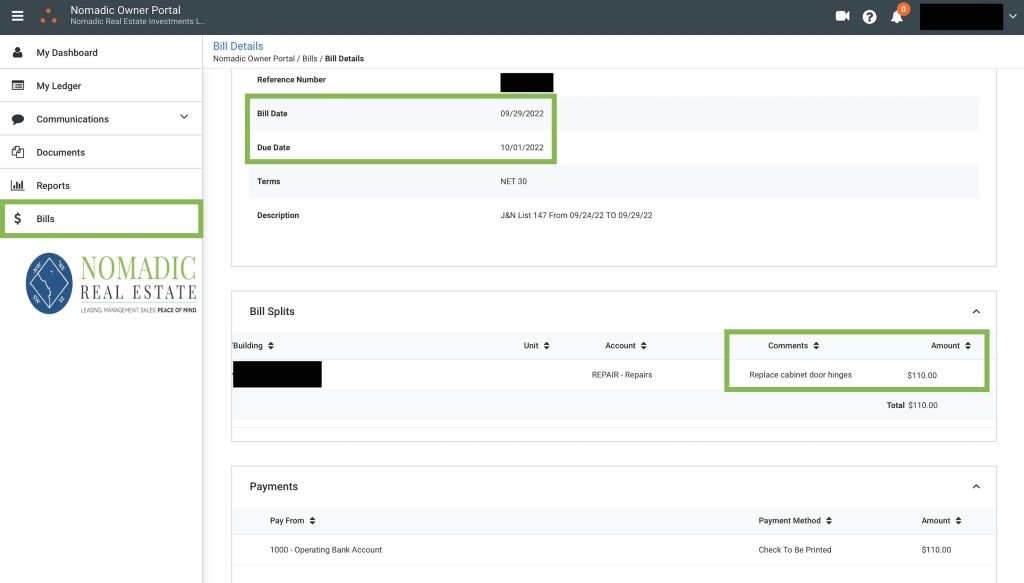
Under Bill Details, you'll find dates/descriptions/amounts and more:

Portal Bill Details

You can also communicate with your Account Manager through the portal:

Owner Portal Communication Tools

How do net distributions work?

Net distributions keep your accounting clean and simple. Each month we’ll collect rent from the tenants, deduct any repair expenses for the previous month and any management/leasing fees for the current month, and credit the remaining net operating income to your account. 

Net Distribution

You’ll receive a statement via email each time a net distribution is processed, and can view all transaction details in your Propertyware owner portal.