How to Make Your Rental Property Pop With Great Listing Photos

Table of Contents

You don’t need expensive equipment and a college degree to take listing photos that get attention.

Key Takeaways:

  • Rental property listings don’t move without great pictures
  • Expensive equipment and professional photographers aren’t always necessary 
  • Use natural light, attractive props, and straightforward compositions to set up your shots

Good listing photos are of the utmost importance when listing a rental property. There is no substitute these days with so many renters looking for homes online where photography is king. This can feel like a stressful barrier to renting a property if photography isn’t your strong suit or you’re worried you’ll have to invest in expensive photography equipment. Taking great shots can be easier than you may think, however, with a few key steps. 

All you really need to take good listing photos is a bit of staging, good lighting, and a camera. Even your cellphone camera will work. This guide walks you through why you need listing pictures, what makes a great one, and how to avoid taking bad listing photos. 

The Importance of Listing Photos

People search for property online these days, and the pictures listed are usually the first look they get at a potential home. Properties can no longer rely on curb appeal alone to interest tenants. They now need web appeal, too. Listing photos are crucial for landlords marketing to tenants who live far away and can’t stop by every property, along with those who want to search many properties online before making a decision. 

Taking great shots is an essential step for landlords. High-quality photos help your listing look professional and instill trust in prospective tenants. There are a few critical dos and don’ts when taking listing photos, and with these tips, you’ll be on your way to snapping inviting photos. 

How to Create a Great Listing Photo

You can’t just point your camera, click the button, and end up with a great picture. Even with all the apps and filters available today, it takes some skill and know-how to make it all work for you. The following tips show you how to use your everyday environment to make your listing pics shine. 

Clean Before Picture Day

You can’t take a great photo of a dirty house. If tenants still live in the home, give them plenty of notice and time to clean. You can clean it yourself or call in a professional if the property is empty. Don’t forget to clean the light bulbs and windows, too. Sometimes a great shot is ruined because the light source is filthy.

Stage the Home

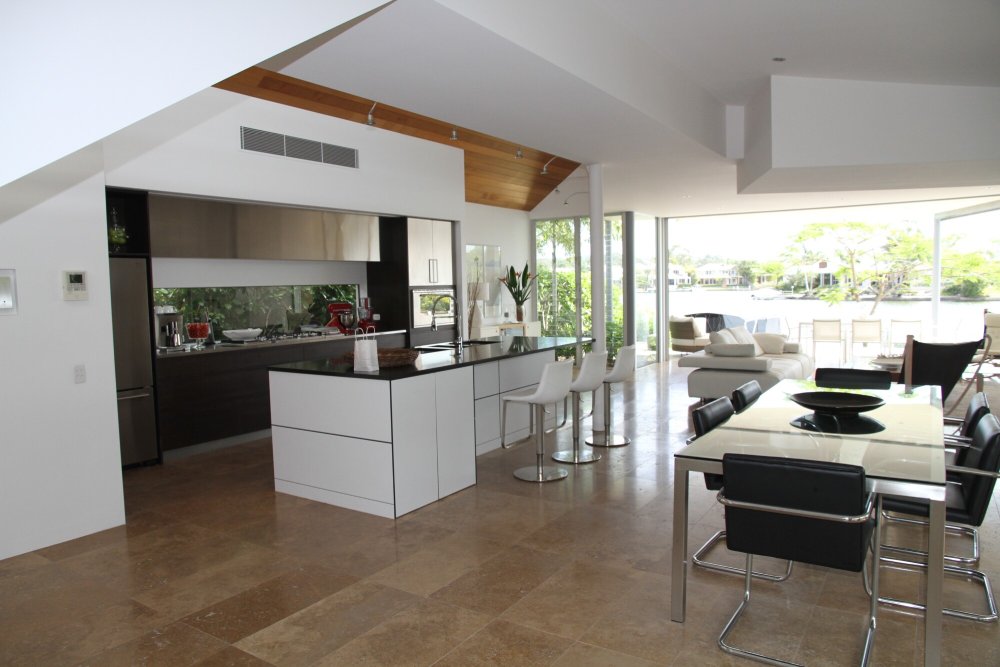
Staging a house, apartment, or condo means setting the scene for a perfect photo. It’s difficult for prospective tenants to see themselves in a home when photos are of empty rooms. It’s much easier to see yourself living in a home with furniture, a television, a laptop on the couch, and a coffee cup on the counter. 

Light the Space

Setting up professional lighting for a photography session is expensive. It also takes some knowledge typically held by professional photographers only. You can save time and money, however, by scheduling your photo shoot when the natural lighting is best in the unit. You can also brighten dark rooms with high-watt overhead light bulbs. 

Choose Props Carefully

Simple furniture and decorations augment a room’s natural charm. Too many props make a photo look staged and phony. It doesn’t resonate with renters. Skip cliché décor, like giant fruit bowls in the kitchen or rose petals and candles around the bathtub. Go for simple, color-coordinated elements instead.

A lot of factors go into getting a great listing photo, but that doesn’t mean it has to be overly complicated. Starting with a plan makes everything a lot easier. Write down all the photos you want to take and when to take them as a starting point. Another helpful tip is to keep a record of listing photo mistakes on hand to reference. 

How to Avoid Taking Bad Listing Photos

What looks like a great shot in your viewfinder can turn out to be a real loser when you see it online. Sometimes props or lighting ideas seem like a creative twist that will get you noticed but disappoint you in the end. Here are a few things to steer clear of with listing photos.

Bad Angles

Sometimes the room or view you’re trying to capture is too big for the lens, or you think a tilted angle would add character to the shot. It usually doesn’t. You’re trying to rent a property, not sell an Andy Warhol print. All your angles should be parallel so the renter can see what they’re paying for. 

Unwelcoming Imagery

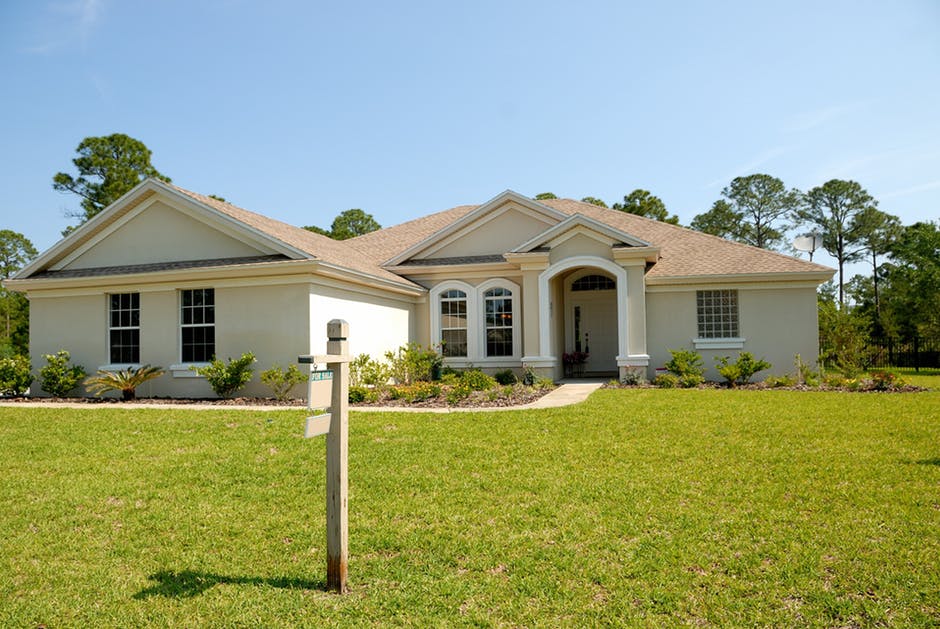
Make sure any picture of the front door looks warm and inviting. No debris or worn yard décor should be seen. An attractive front door and entryway make people want to go in and maybe even live there. Do away with any no-trespassing signs or keep-out notices. Replace them with some bright flowers and a welcome sign.

Fisheye Lenses

Many property managers use fisheye lenses to enlarge their small spaces. This typically has the opposite effect, however, and is also disorienting to a lot of people. Go for a bird’s eye view or a wide-angle lens if you’re looking for something different to jazz up the look of a small space.

Avoiding these common photo mistakes can go a long way in improving your listing photos. Reminding yourself of what not to do is as important as knowing what to do during a photo shoot to help prevent bad listing photos. 

Any property manager can take phenomenal photos of their rental property with just a cellphone camera. Attention to environmental details can turn an average picture into a moneymaker and help you have your pick of desirable tenants. 

Get Help Managing Your Property From the Pros

Creating great real estate listing photos is just one of the many jobs of a property manager. Nomadic Real Estate can take some of that burden off your plate. We help landlords fill available rentals with qualified tenants, manage payments, and keep properties at their best. Contact Nomadic Real Estate for more information about your Greater D.C. property management needs.

Share via Email
Share on Facebook
Share on LinkedIn
Share on Twitter
Get help from DC's top real estate team.
Founded in 2005, Nomadic is the go-to full service real estate firm in the DMV. We've helped thousands of landlords, investors, and residents and we would love to connect with you next.

Check out more of our blog posts below!

Or search for a different topic:

Scroll to Top

Enhanced Reporting

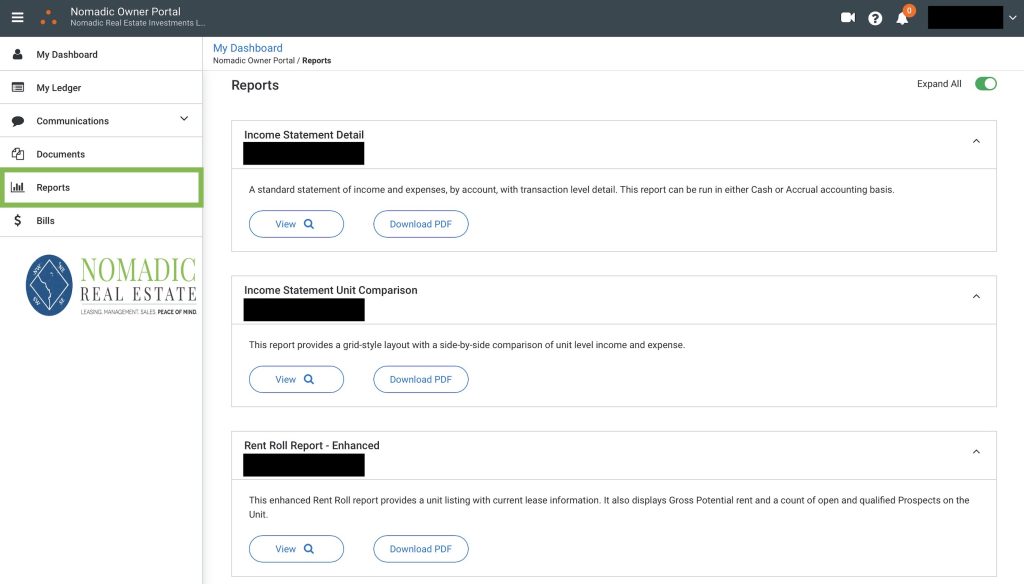
Your portal includes a selection of extremely useful reports. Reports are available in the “Reports” section, and are distinct from the financial statements. Unlike financial statements which are static records, Reports are dynamic real-time records that will update with current data every time you view them. 

Scroll down to learn more about Reports:

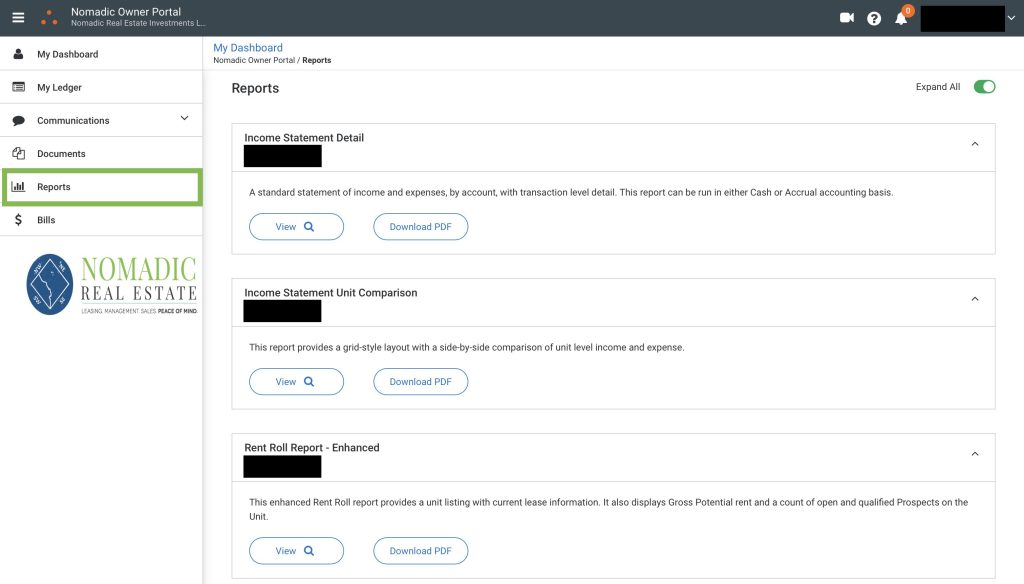
Navigate to the "Reports" module in your portal:

Owner Portal Reports
  • Keep in mind, these reports are dynamic records. They will refresh to display current information every time you view them. 

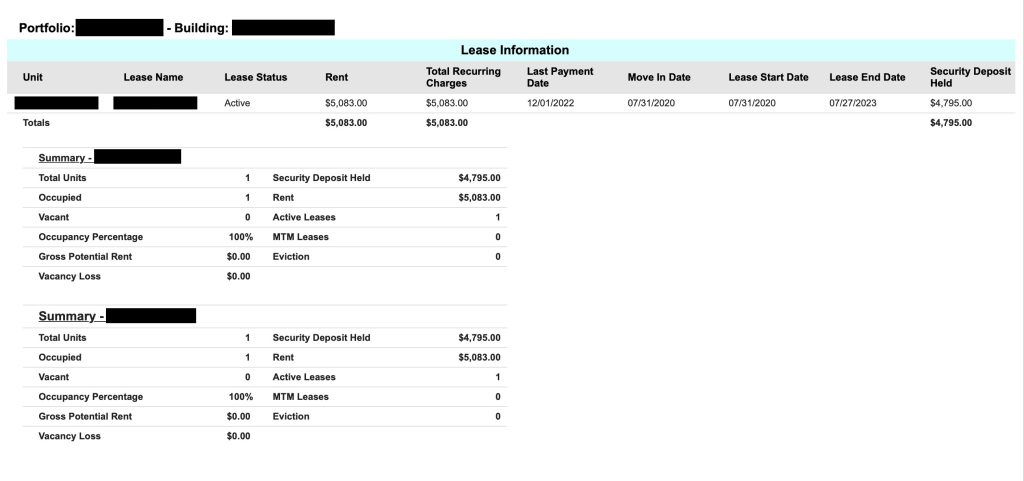
Enhanced Rent Roll Report:

Enhanced Rent Roll Report
  • The Enhanced Rent Roll Report will show the rent amount, last payment date, move-in date, lease expiration date, and security deposit amount for each of your tenants. 
  • It will also show a portfolio summary with occupancy percentage, vacancy loss, and more!

Unit Comparison Report:

Unit Comparison Report
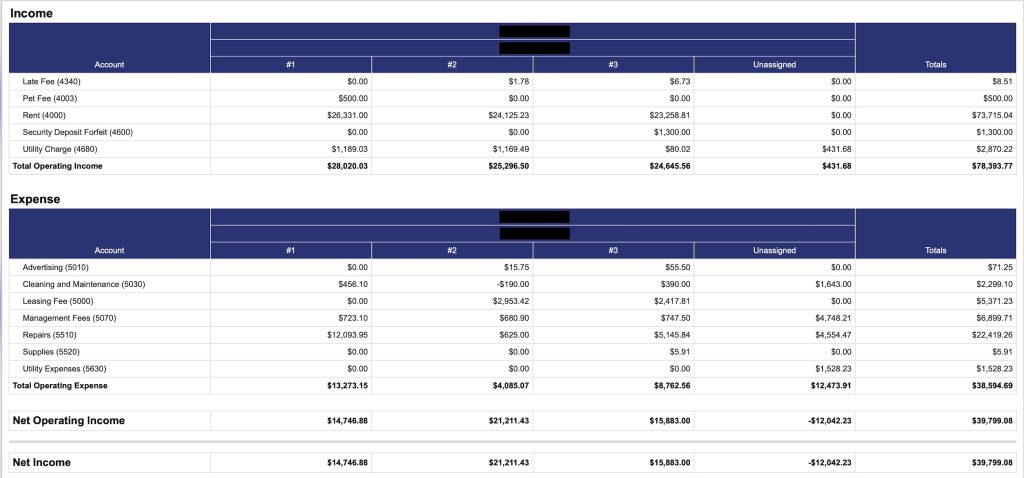
  • If you own multiple units (or buildings) with Nomadic, you’ll get access to the Unit Comparison Report. 
  • This report enables you to quickly compare financial performance between your units at a glance without toggling between individual reports. 

Income Statement Month-Over-Month:

Income Statement by Month Report
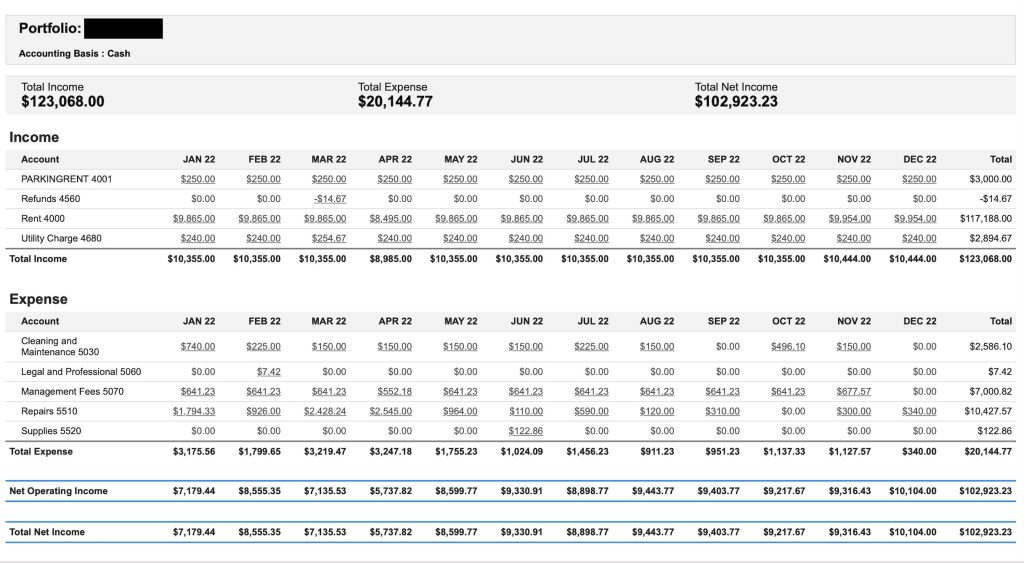
  • The Income Statement Detail – Monthly Report serves as a month-over-month record of portfolio performance. You’ll see itemized income and expense categories and can track monthly. This report will update with fresh data every time you view it. 

Financial Statements

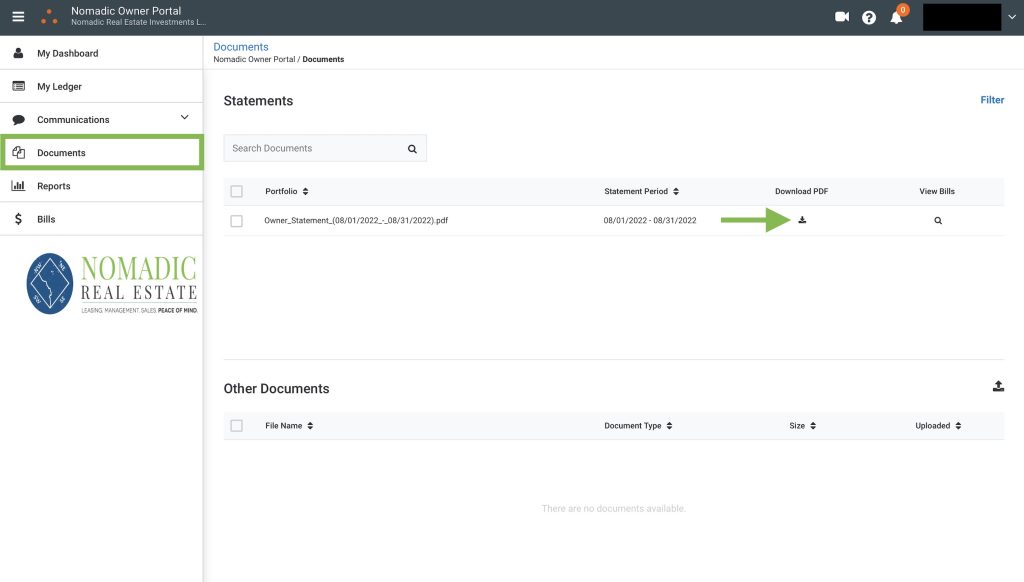
Financial statements will be published to your portal on a monthly basis. The statements are found in your Documents library, and provide a historical record of all financial performance. The statements serve as a snapshot of financial performance over a given period, and are static documents (unlike Reports, the statements do not update/change in real-time). 

Scroll down for more info about the Financial Statements in your Documents library:

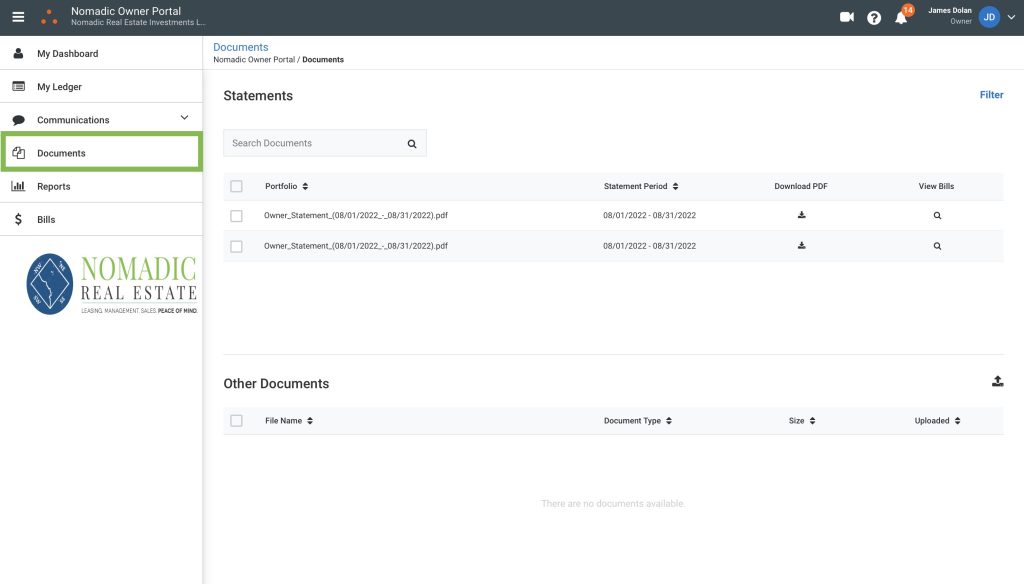
The Documents area contains monthly financial statements:

Owner Portal Documents
  • The statements in the Documents are are static documents. They are posted to the portal once a month to serve as a historical record of financial performance. 

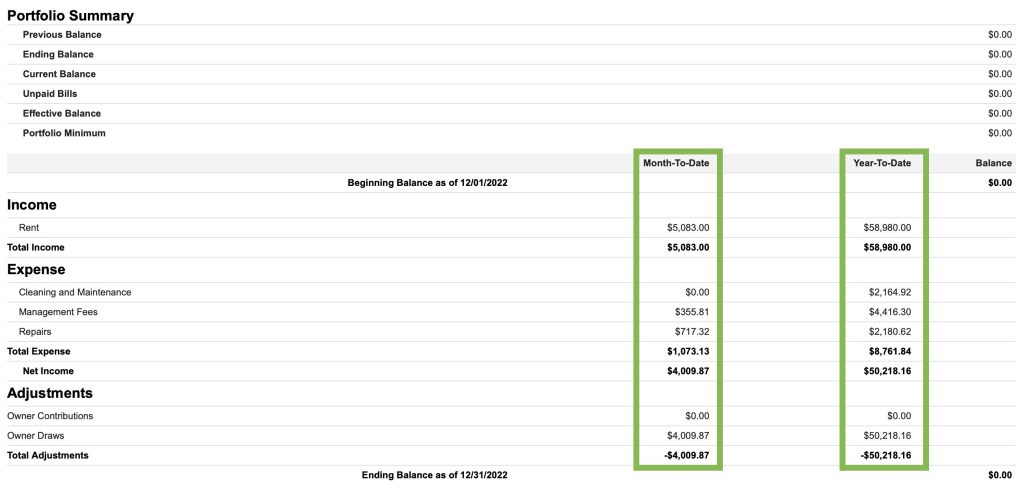
Download a statement to see month and YTD financials:

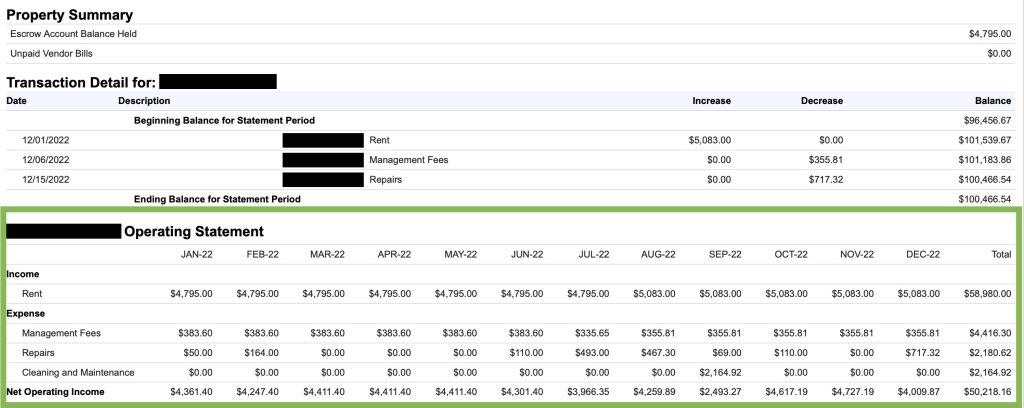
Owner Portal Property Statement

You'll also find a month-over-month operating statement:

Month over Month Statement

Portal Communication Tool

You can use your owner portal to communicate with our team. Any messages you send through the portal will go straight to your Account Manager. When we reply, you’ll get an email notification and you’ll also see the message in your portal next time you log in. 

Here’s an overview of using the communication platform:

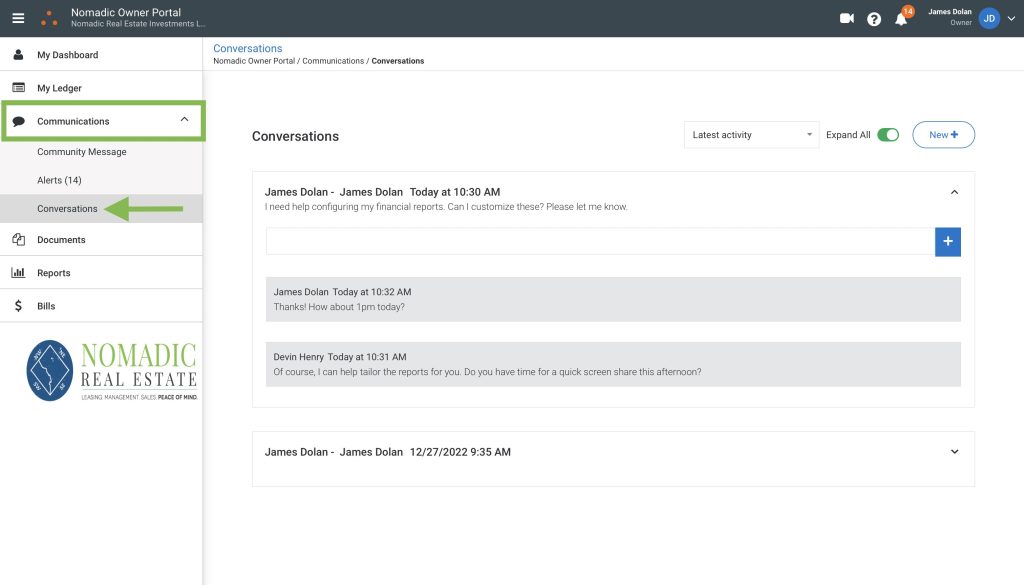
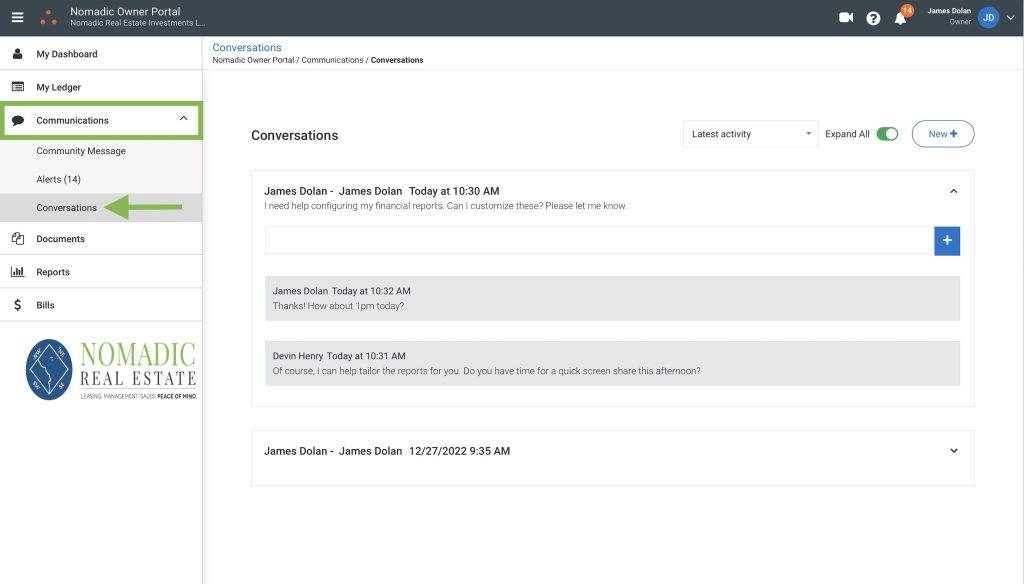
Click "Communications" and navigate to "Conversations":

Commincation Dashboard Screenshot
  • The communications module will contain a record of all messages that you create through the portal. 

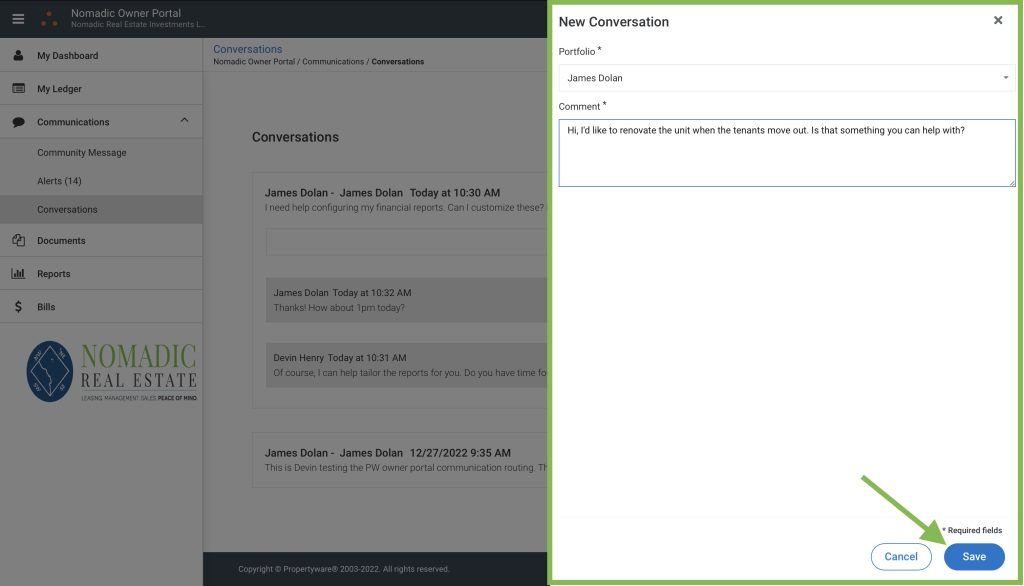
Click the "New Message" button and send your message:

Owner Portal New Message Screenshot

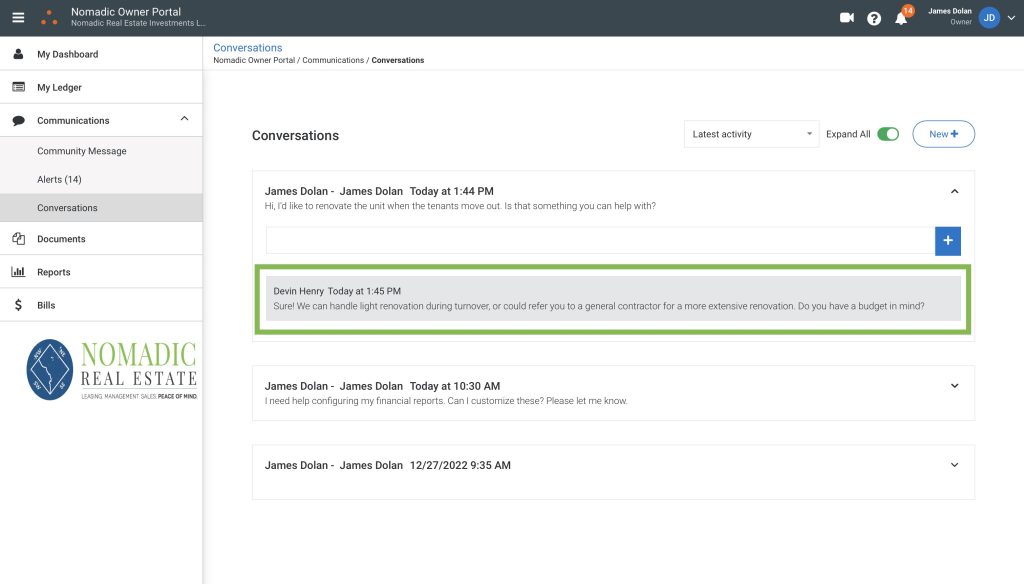
Responses will show up in the conversation ticket:

Portal Conversation Response Screenshot
  • You’ll get an email notification whenever you get a response, and you’ll also see the message in your portal next time you log in. 

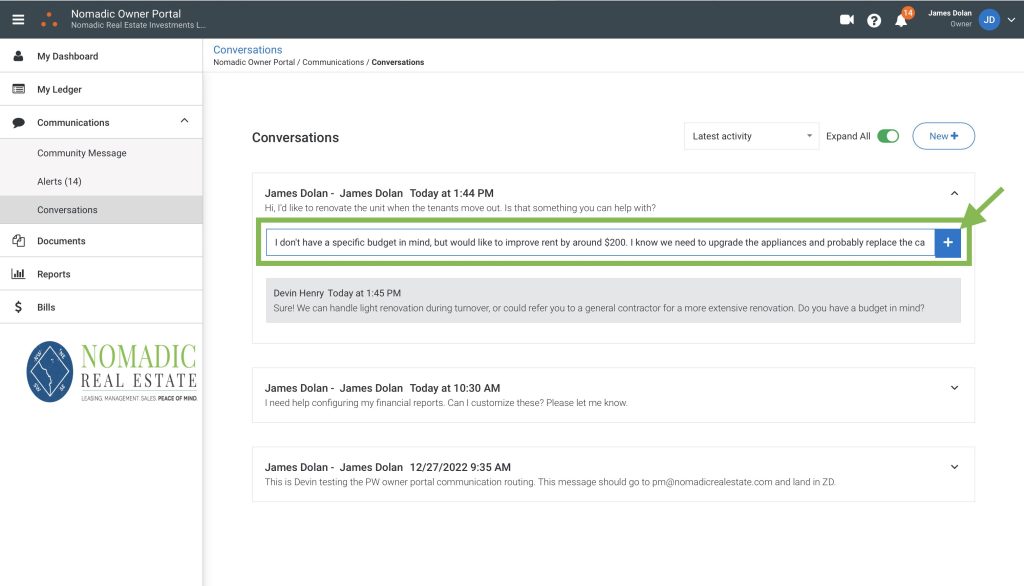
You can reply in-line using the comment box:

Owner Portal Comment

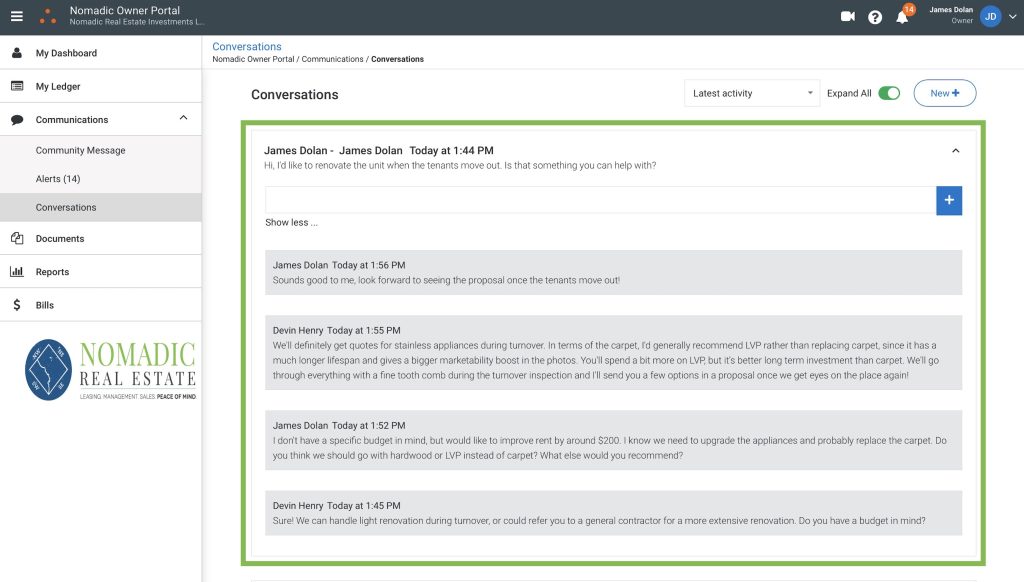
Each conversation will be logged in its entirety:

Portal Conversation Snapshot

Understanding the Ledger

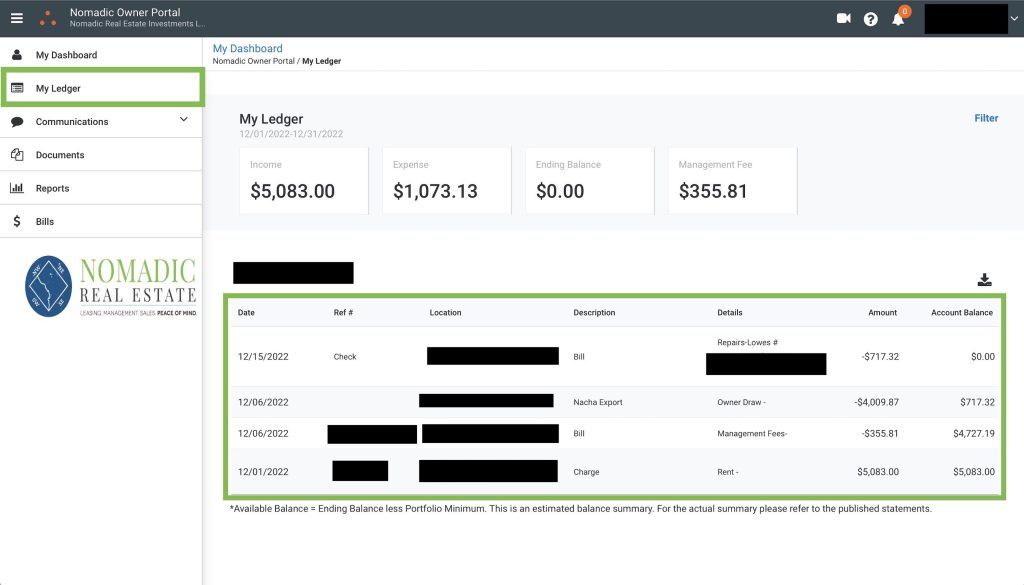
Your portal includes a ledger with all transactions. The ledger is populated with data in real-time as transactions flow through our accounting software. Much of this information is also available in the Reports area, as well as the Statements in your Documents library, but the ledger is the most comprehensive resource for diving into the details. 

Please scroll through the sections below to get a better understanding of how to interpret the ledger. 

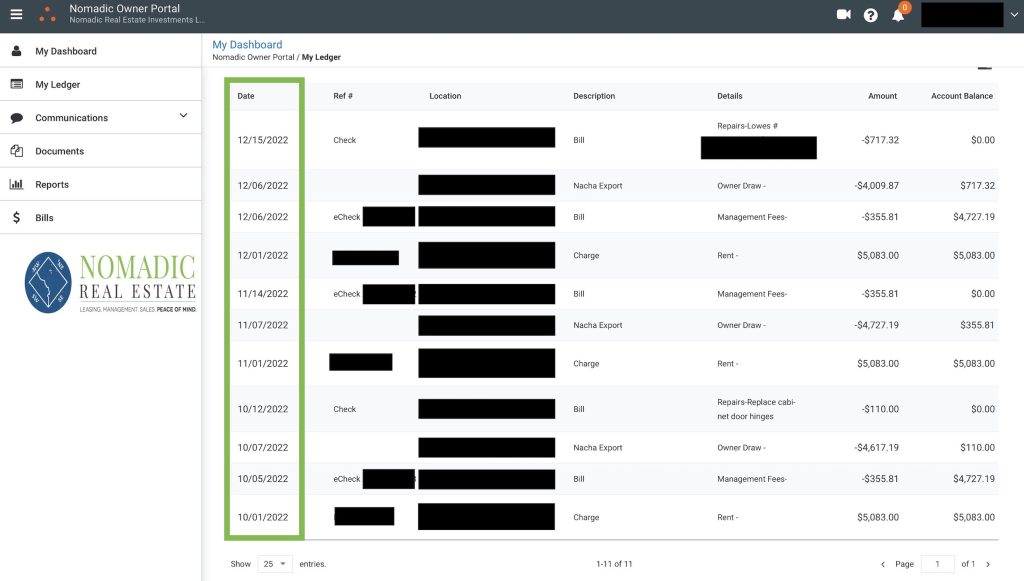
By default, transactions are sorted chronologically:

Owner Ledger Dates
  • The date reflected in the lefthand column is the actual transaction date, not the “bill date”. This is the date the transaction was actually processed. 

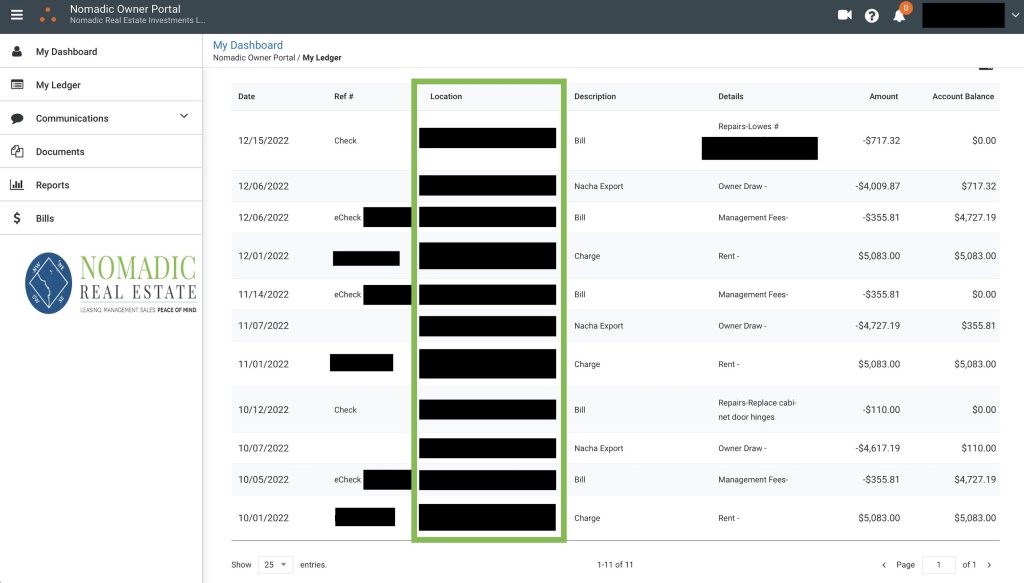
If you have multiple properties with Nomadic, you'll see the address for each transaction in the "Location" column:

Ledger Property Column
  • You can filter the ledger to look at just one property, all properties, or specific sets of properties. 
  • If you only have one property with us, you’ll just see the ledger for that property. 

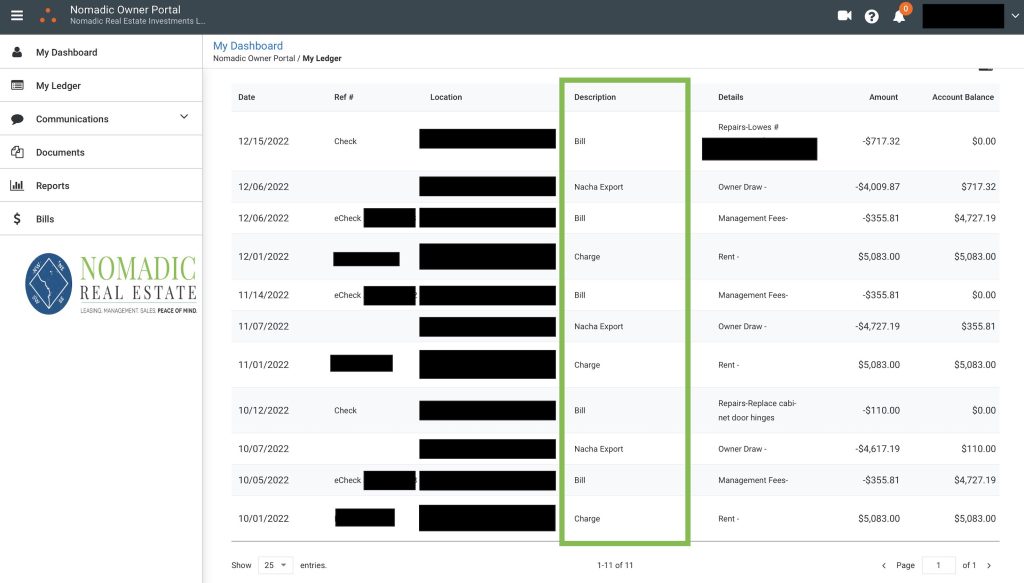
The Description column displays the transaction type:

Owner Ledger Description Column
  • BILL: this is an expense transaction, such as for repair costs or management fees.
  • CHARGE: this is a transaction  billed to the tenant, most typically a rent payment. 
  • NACHA EXPORT: this is a credit we processed to your distribution account. This type of transaction is how you get paid! 

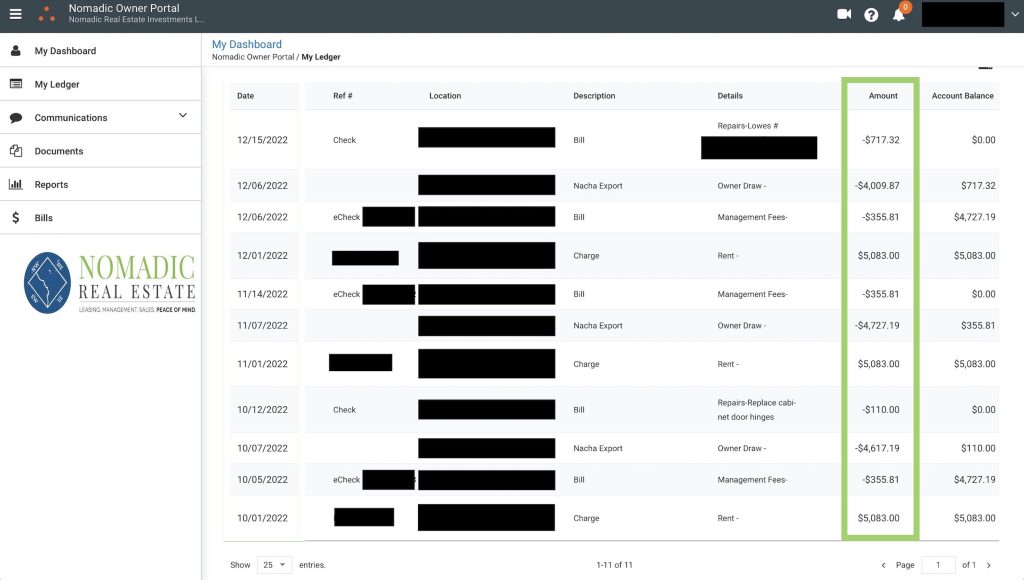
The Amount column shows the dollar value of each transaction:

Owner Ledger Amount Column
  • Positive Amounts: if an amount is positive, it reflects a transaction that is payable to you. Typically, this will be a rent payment that we collected from your tenants. On occasion, a positive number could also signify a journal entry or credit adjustment. 
  • Negative Amounts:  if an amount is negative, this is a transaction that is either payable to Nomadic or is an amount that has already been paid to you. Typically this will be for repair costs or management/leasing fees. Owner draws (net distributions into your checking/savings account) also reflect as negative amounts, since they have already been paid to you. 

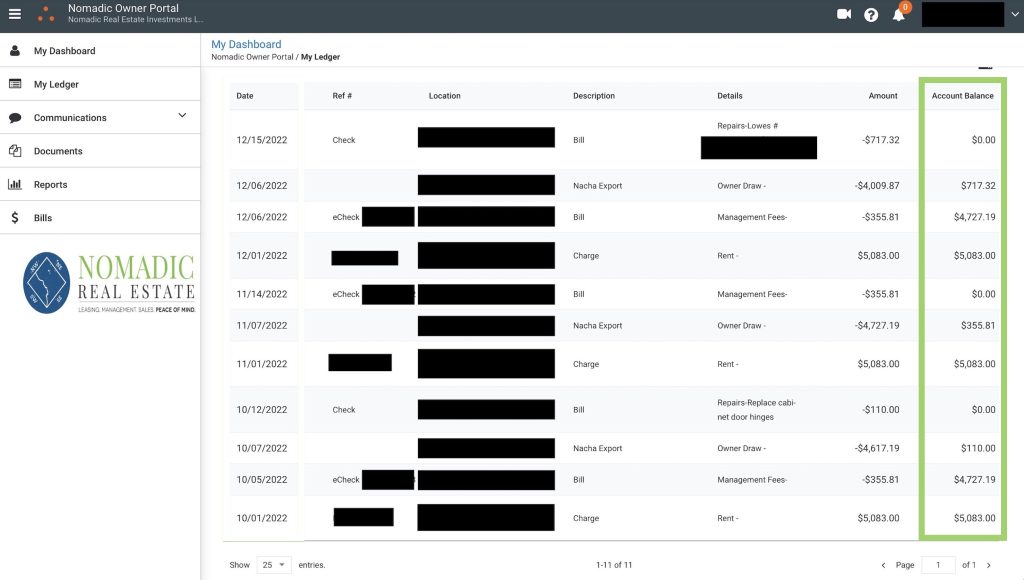
The Account Balance column shows a sum of positive/negative transactions at a given point in time:

Owner Ledger Account Balance Column
  • Account Balance should always equal zero after a net distribution has been processed. When the balance is zero, this means that all expenses have been paid and you’ve received the remainder as net operating income, leaving a balance of zero (meaning: no one is due any money, as all funds have been distributed appropriately). 

Navigating the Propertyware Owner Portal

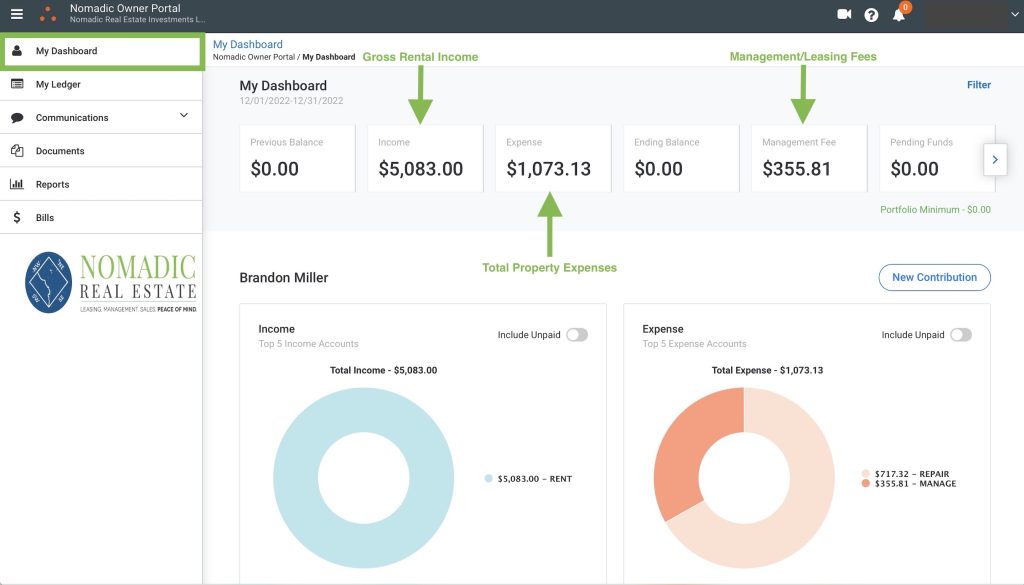
Your portal includes some extremely useful features that help you understand your property’s financial performance at a new level, with real-time transparency into every transaction.

Scroll through the snapshots below for an overview of portal navigation! If you need more help or have specific questions about using the portal, you can reach out to your Account Manager any time for a screen share. 

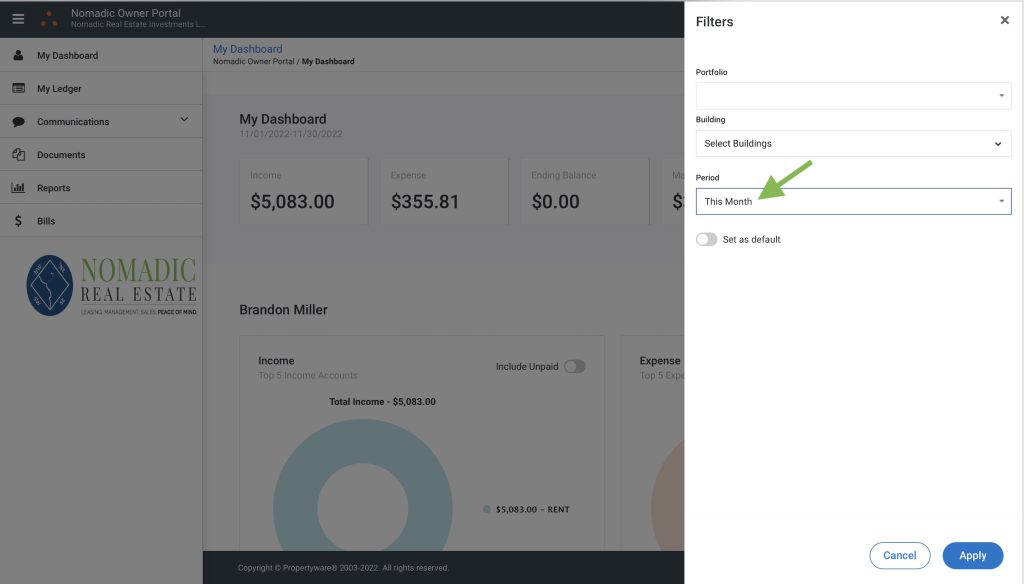
You can filter all info by date range or property:

PW Portal Filters

View a snapshot of income and expenses on your dashboard:

PW Owner Dashboard View

See every transaction in real-time on your ledger:

Owner Portal Ledger View

Statements and forms will be posted to your documents library:

Owner Portal Document Library

View a suite of real-time financial reports:

Portal Reports View

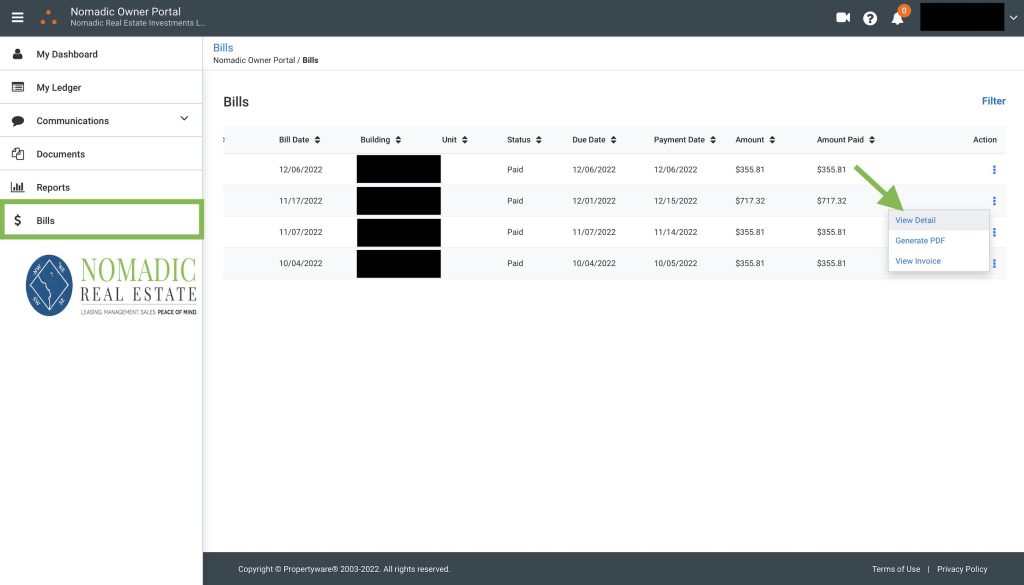
See a running list of all bills, and drill down for more detail:

Owner Portal Bills View

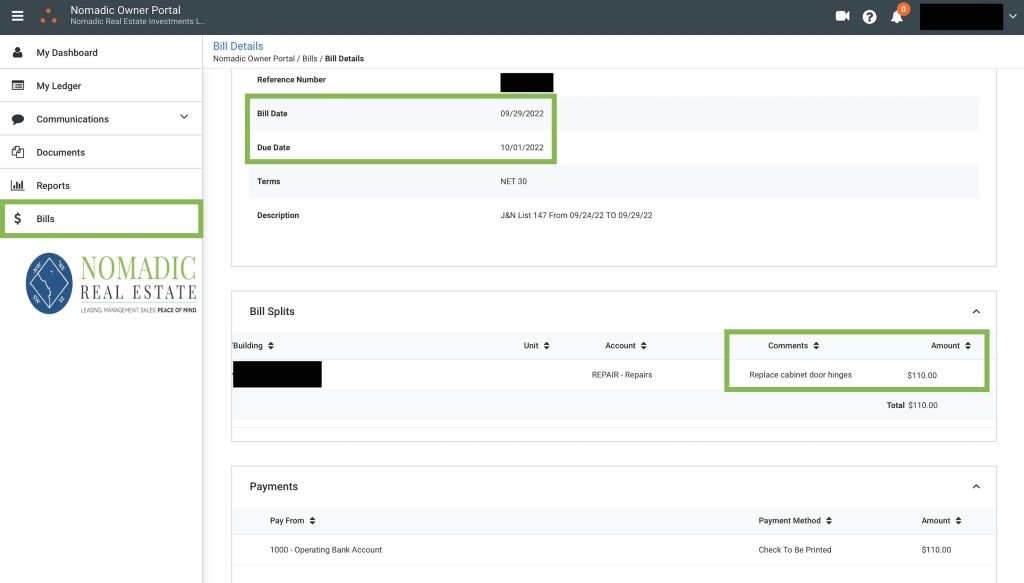
Under Bill Details, you'll find dates/descriptions/amounts and more:

Portal Bill Details

You can also communicate with your Account Manager through the portal:

Owner Portal Communication Tools

How do net distributions work?

Net distributions keep your accounting clean and simple. Each month we’ll collect rent from the tenants, deduct any repair expenses for the previous month and any management/leasing fees for the current month, and credit the remaining net operating income to your account. 

Net Distribution

You’ll receive a statement via email each time a net distribution is processed, and can view all transaction details in your Propertyware owner portal.